Jump to:
How to activate check-in/out
The check-in/out functionality requires users to check-in to their desks after their booking starts.
Check-in/out can be activated on a space group level. To do so, go to Settings → Space types → click on type → Groups → click on group → Check-in.
Enable the check-in/out functionality by activating the “Require check-in” option. Then, select the check-in strategy:
- Simple (user action required) - Users will be required to check-in from the browser, Teams, or Mobile.
- WiFi (automated) - Users will have to connect to the internal WiFi network in order to check-in automatically.
- QR code scan (user action required) - Users will be required to scan a QR code with the YAROOMS Mobile App.
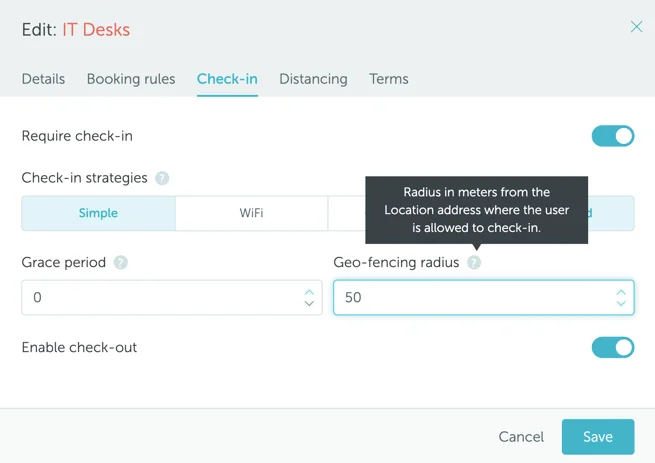
- Geo-fenced (automated) - Similar to the Simple check-in, but users will not be allowed to perform the action if they are outside the set radius in meters.
Administrators may configure one or multiple check-in strategies simultaneously. When multiple strategies are enabled, the system will register the check-in as soon as the conditions of the first applicable strategy are satisfied.
2. Geo-fenced requirements
To successfully activate the geo-fenced check-in strategy, you must:
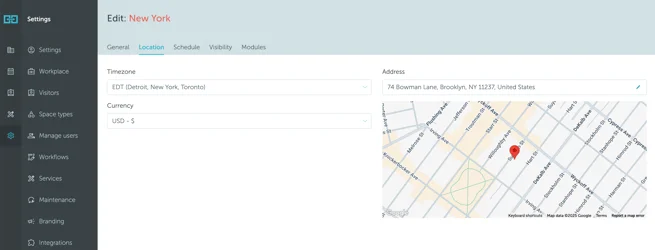
- Set the location address in the system: Go to Settings → Workplace → Edit selected location → Location and fill in the “Address” field.
- Set the Geo-fencing radius: Go to Settings → Space types → click on type → Groups → click on group → Check-in
3. Automated Wi-fi Check-In requirements
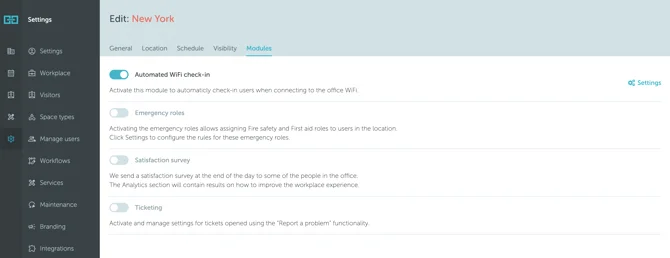
The automated check-in is based on Wi-Fi connection. In order for this to be set up, the “Automated Wi-Fi Check-in” module should be enabled at the location level: Settings → Workplace → click on location name → Edit (right side of the screen) → Modules.
Activate the “Automated Wi-Fi Check-in” module by toggling it on, and then click the small “Settings” button located to its right.
Admins must provide a complete list of public IP addresses for the location, including:
- A mandatory label.
- The IP address in CIDR format (mandatory).
The IP address must be provided fully, also containing its mask (example: 123.123.123.123/32).
4. Setting the Grace Period
The grace period represents the timeframe (number of minutes) during which the booker is allowed to perform the check-in. It starts along with the booking and, if activated, it transforms the check-in into a mandatory action. Failing to perform the check-in during this period will render the booking cancelled and the space open for other users.
If no check-in was performed, a 9 AM space reservation with a 15-minute grace period will be canceled automatically at 9.15 AM.
If the grace period is set to zero, that means that the check-in can be performed at any time during the booking interval.
5. How to print the QR codes
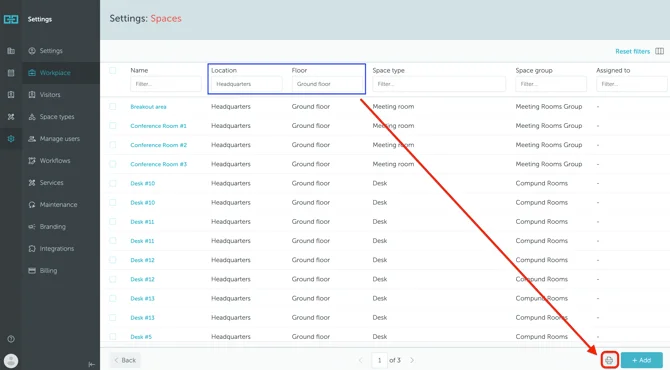
To print the QR codes that can be added to bookable spaces, go to Settings → Workplace → click on the “View all Spaces” button. That will show all the spaces found in your account, across all floors and locations.
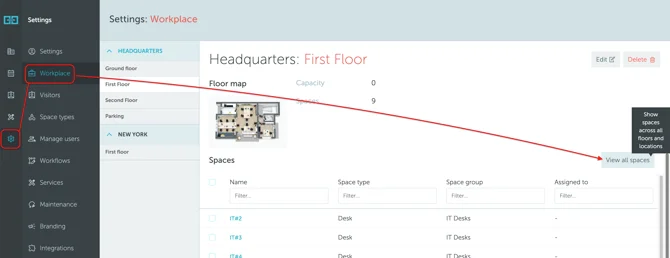
From there, filter the results by location, floor, or any other criteria you need, and then click the Print button at the bottom-right of the page.
If you are looking for more information about setting up space types and groups, read this article .
6. Who can check-in on behalf of others
The only users permitted to check-in on behalf of others are:
- Administrators & Supervisors - They can perform this action for any user.
- User Team Managers - They can check-in for any user within the group they manage.
- Direct Managers - They can only check-in for the user to whom they are assigned.
- Custom Users - Users who have been given specific Admin rights that allows them to perform this task.