How to enable badge printing and set up your printer
This article explains how to enable the visitor badge printing feature in YAROOMS and set up your printer.
1. How to activate badge printing
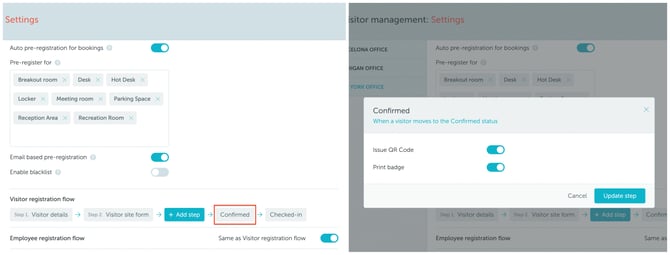
Go to Visitor Management → Settings → Edit location → Visitor Registration Flow → Press "Confirmed"→ toggle Print badge on.

2. How to set up your printer
- The printer should have Wi-Fi enabled from the factory - if not, the Wi-Fi menu allows you to enable it
- The printer should have both "Direct Mode" and "Infrastructure Mode" enabled from the factory - if not, the Wi-Fi menu allows you to enable both
- The IP allocated to your printer should be a FIXED IP inside your network. Otherwisew it may change over time (once every few days / weeks). Consult your network/IT specialist on how to ensure a FIXED IP is assigned
- We used the Brother QL-820NWBc printer for testing. Make sure you’re using the correct paper roll - the setup sizes we provide work with the following rolls: DK-2251, DK-22205, and DK-11202.
Step 1: Find direct mode printer IP
- Start printer
- Open menu and navigate to "Wi-Fi" menu using arrows & select it using OK button
- Navigate to "Wi-Fi status" option using arrows & select it using OK button
- Navigate to "Direct mode status" option using arrows & select it using OK button
- Write down the IP the printer provides
Step 2: Find direct mode printer password
- Open menu and navigate to "Wi-Fi" menu using arrows & select it using OK button
- Navigate to "Direct Manual Setting" status option using arrows & select it using OK button
- You will be presented with the SSID (network name) to be edited - just click OK
- A page will confirm the final SSID (network name) - write it down and then click OK
- You will be presented with the password to be edited - just click OK
- A page will confirm the final password - write it down and then click OK
Step 3: Connect your laptop to the printer via Direct Mode
- Connect your laptop to the printer's "Direct mode" Wi-Fi that has the name & password you wrote down in Step 2
- Open a browser and in the browser's address bar type the in IP you wrote down in Step 1
- A button in the sidebar will invite you to the secured version of the site -- click it
- Login using the password printed on the underside of the printer (`Pwd: ...`)
- Visit the Network → Wireless section & choose Personal/Enterprise
- Select "Browse" and identify your local Wi-Fi network
- Select your network & click submit
- Configure wirless security details (type, password) & save
Step 4: Find infrastructure mode printer IP
- Start printer
- Open menu and navigate to "Wi-Fi" menu using arrows & select it using OK button
- Navigate to "Wi-Fi status" option using arrows & select it using OK button
- Navigate to "Infrastructure mode status" option using arrows & select it using OK button
- Write down the IP the printer provides
Step 5: Complete setup in YAROOMS
- In YAROOMS, go to Visitor Management → Reception
- In the Reception menu - Badges tab - insert the previously provided printer IP in the Printer IP field
- Fill in the rest of the fields according to your needs