Jump to:
- Generating the Token Signing Certificate and obtaining the URL of the AD FS machine
- Get the Issuer URL for the AD FS server
- Get the SAML Endpoint for the AD FS machine
- Set up the Trust Relationship on the AD FS machine
- Configure the SAML 2.0 Connection in YAROOMS
- Complete settings for the Trust Relationship on the AD FS machine
Note: Configuring AD FS SAML 2.0 Integration is a back-and-forth process between setting up the AD FS machine and the YAROOMS Integrations. Also, AD FS SAML can be integrated with YAROOMS only if all LDAP accounts meant to use the integration have valid email addresses attached.
STEP 1: Generating the Token Signing Certificate and obtaining the URL of the AD FS machine
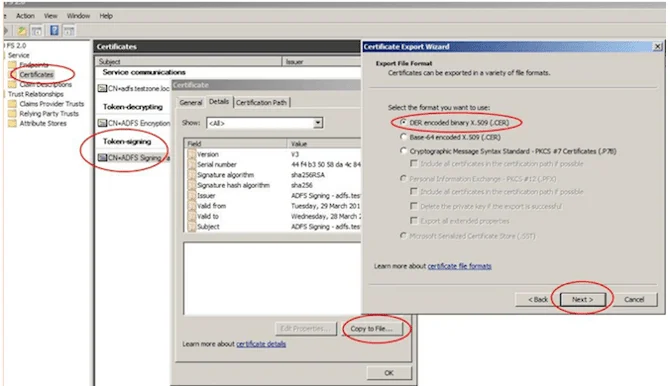
- Navigate to Administrative Tools → AD FS Management on the AD FS machine
- Expand Services and click the “Certificates” node
- Double click the “Token Signing” certificate
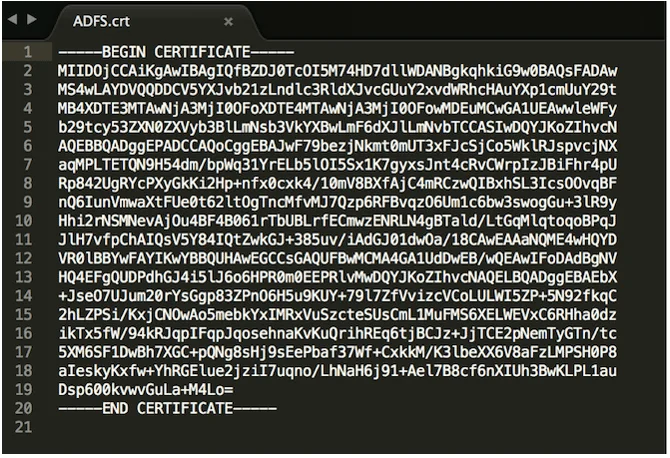
- Click the “Details” tab then “Copy to File” button
- Save the certificate in DER format
Note: Convert the file to PEM format using tools like OpenSSL or online conversion tools (such as SSLShopper, RapidSSLOnline, etc.), required by the YAROOMS SAML Integration mechanism.
- Store the resulting hashed string for later use
- With the Certificate still open, click the “General” tab
- Under “Issued to” and “Issued by,” find the external server URL of the AD FS machine (example: https://yarooms.westeurope.cloudapp.azure.com )
- Store this value for later use
STEP 2: Get the Issuer URL for the AD FS server
- Close the certificate window and click on Services → Endpoints
- Scroll to Metadata section and locate Type: Federation Metadata
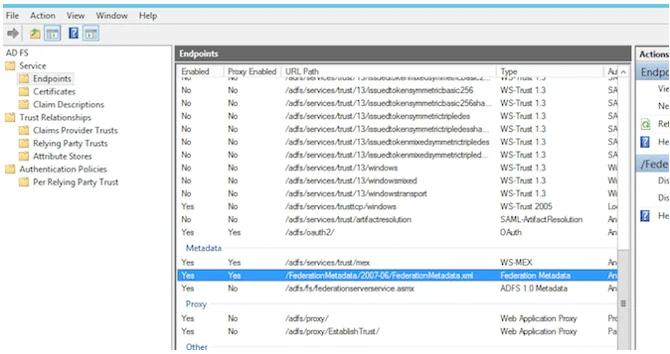
- Get the URL Path and add it to the server URL from Step 1
- For the example: https://yarooms.westeurope.cloudapp.azure.com/FederationMetadata/2007-06/FederationMetadata.xml
- Access the link and open the target XML file
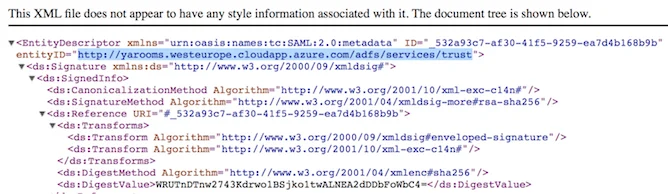
- Look for the value of the entityID property and copy it – this is the Issuer URL
- For the example: https://yarooms.westeurope.cloudapp.azure.com/adfs/services/trust
STEP 3: Get the SAML Endpoint for the AD FS machine
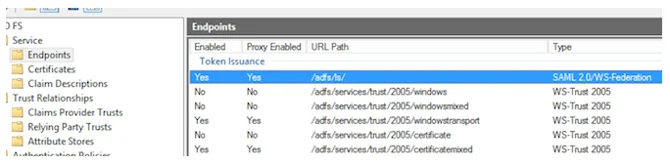
- Return to the Endpoints list and scroll to Token Issuance section
- Look for the item Type: SAML 2.0/WS-Federation and copy the value
- Add this to the server URL from STEP 1 to get the SAML Endpoint
- For the example: https://yarooms.westeurope.cloudapp.azure.com/adfs/ls/
- Note: The slash at the end of the URL is mandatory.
STEP 4: Set up the Trust Relationship on the AD FS machine
Click on Trust Relationships → Relying Party Trusts, then Add Relying Party Trust. Follow these wizard steps:
- Select Data Source: Enter data about the relying party manually
- Specify Display Name: A display name such as YAROOMS SAML
- Choose Profile: AD FS Profile
- Configure Certificate: Leave blank
- Configure URL: Check Enable support for the SAML 2.0 Web SSO Protocol. Enter a placeholder URL (like your YAROOMS domain URL). This will be edited later
- Configure Identifiers: Type a placeholder URL and click Add. This will be edited later
- Configure Multi-factor Authentication Now: Check “I do not want to configure multi-factor…”
- Choose Issuance Authorization Rules: Permit all users to access this relying party
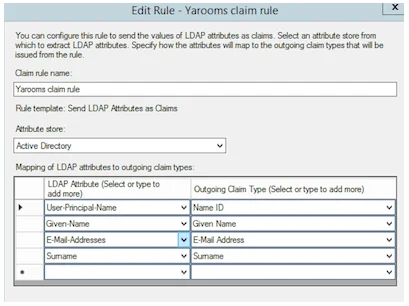
Complete the Wizard and open the Edit Claim Rules Dialog. In the “Issuance Transform Rules” tab click Add Rule.
- Choose Rule Type: Send LDAP Attributes as Claims
- Claim rule name: Type a name for the rule
- Attribute Store: Active Directory
- Mapping of LDAP attributes [LDAP Attribute → Outgoing Claim Type]:
- User-Principal-Name : Name ID
- Given-Name: Given Name
- E-Mail-Addresses : E-Mail Address
- Surname : Surname
STEP 5: Configure the SAML 2.0 Connection in YAROOMS
- Login as an administrator to your YAROOMS domain
- Navigate to Settings → Integrations → SAML 2.0 Authentication
- In the Connection tab, fill in the form:
- Identity Provider: type AD FS (appears on login page as “Authenticate with AD FS”)
- Issuer URL: the Issuer URL link from step 2
- SAML Endpoint: the SAML Endpoint URL from step 3
- X.509 Certificate: the hashed string in PEM format from step 1
- Name ID Format: choose “unspecified”
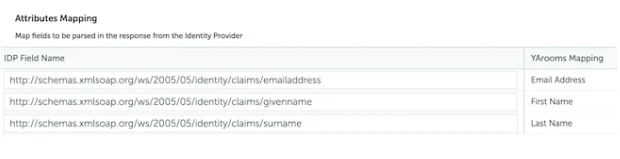
- Attributes Mapping:
- Map Email to: http://schemas.xmlsoap.org/ws/2005/05/identity/claims/emailaddress
- Map First Name to: http://schemas.xmlsoap.org/ws/2005/05/identity/claims/givenname
- Map Last Name to: http://schemas.xmlsoap.org/ws/2005/05/identity/claims/surname
- Save options and navigate to User options tab

- Set default group and location for new users created from the Identity Provider
- Save User options and navigate to “Application details” tab
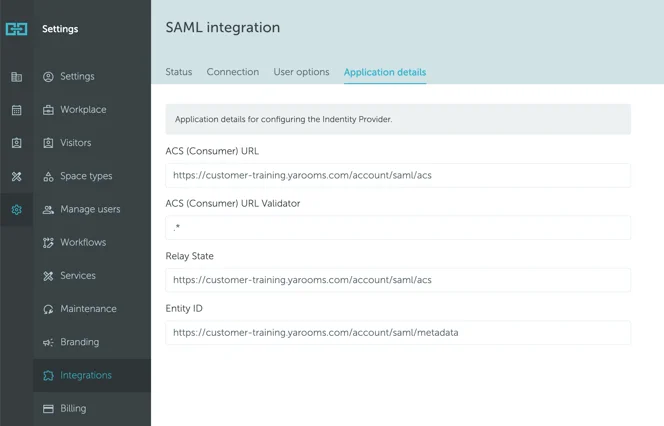
- Activate SAML Integration
- Note the values in this tab – they are placeholders dependent on your YAROOMS account
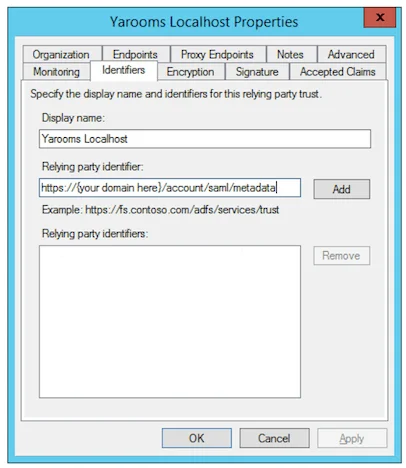
STEP 6: Complete settings for the Trust Relationship on the AD FS machine
Return to the AD FS machine and edit the Relying Party Trust:
- In the Advanced tab, set Secure hash algorithm to SHA1
- In the “Identifiers” tab add a Relying party identifier with the URL listed as Entity ID in YAROOMS “Application details” tab
- In the “Endpoints” tab click “Add SAML”
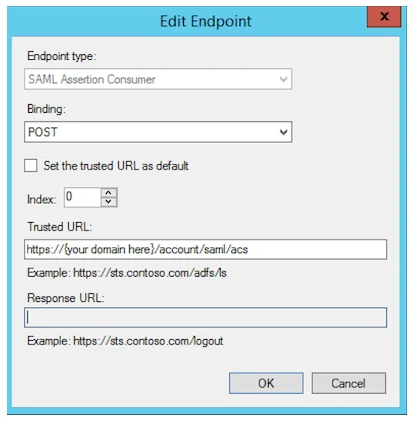
- Set Endpoint type to SAML Assertion Consumer
- Set Binding to POST
- Set Trusted URL to the ACS (Consumer) URL value from YAROOMS “Application details” page
Important: This tutorial does not cover user provisioning and assignment in AD FS. It assumes you are already familiar with configuring AD FS settings specific to your organization’s user setup.