
Jump to:
As a YAROOMS administrator, your first job is to make your workplace bookable and give people access to the right spaces. This guide covers the essentials: the office structure, the rules spaces share, and the users who will book them.
Start with one location and floor. Check your space types and groups, create a few spaces, then configure access and invite a small group of users before extending the setup to the rest of your office.
💡 Key concepts
- Spaces: individual bookable resources, such as a desk, meeting room, office, or parking spot.
- Space Types: resource categories, such as Desks, Meeting Rooms, Offices, or Parking.
- Space Groups: groups within a space type, organized by floor, department, or shared rules. A Desks type might include First Floor Desks, IT Desks, and Sales Desks.
- Teams: groups of users, such as IT or Sales, whose members inherit the team's access roles.
- Access Roles: the link between people and spaces. They grant booking permissions for selected space groups and can be assigned to teams or individual users.
This guide focuses on administration. For finding a space, making a booking, and checking in, use the End User Training Guide.
Understanding Your Account Structure
Imagine you are setting up your London office in YAROOMS. It has two floors, desks, and meeting rooms. Some desks are for IT, while others are for Sales. How do you set this up so everyone can book the right desk?
Start with the office and its desks
Your London office is a location. Inside it, you create the Ground floor and First floor. Each desk you add to a floor, such as Desk 01, is a space that someone can book.
Next, think about the kinds of spaces you have. Create Desks and Meeting Rooms as your space types. If people can also book parking spots, add Parking as another type.
Within Desks, create IT Desks and Sales Desks. These are space groups. When you add Desk 01, choose Desks as its type and IT Desks as its group. You are telling YAROOMS: “This is a desk, and it belongs with the IT desks.”
Decide who can book which desks
Now put your IT colleagues together in an IT team, and your Sales colleagues in a Sales team. A team is a group of people, not a group of desks.
How do you give the IT team permission to book the IT desks? Create a role called IT Access (an access role), select IT Desks in its booking access settings, and give that role to the IT team.
The result: everyone in the IT team can book the desks in IT Desks. Repeat this for Sales, choosing Sales Desks instead.
Think of it this way: the team says who, the space group says which desks, and the access role gives permission. You can also give a role directly to one person if they need extra access.
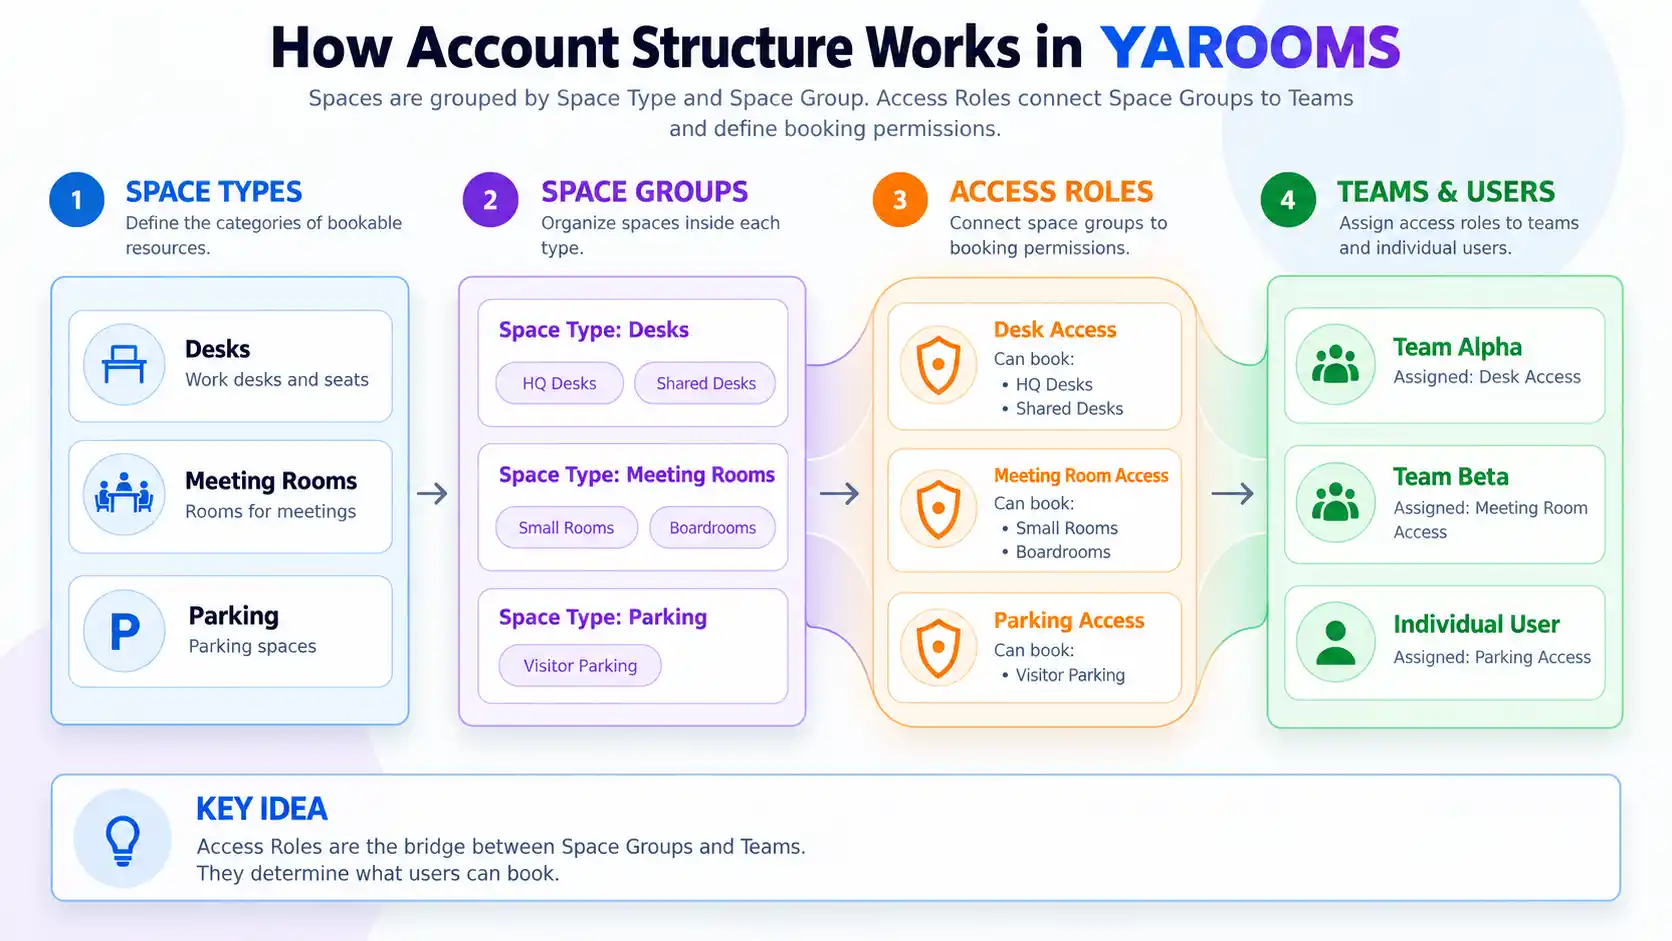
Note: The name IT Desks is just a label. It does not stop other people from booking those desks. If they should be for IT only, make sure no role assigned to other regular users also gives access to that group.
Groups can also have different booking rules
You do not have to group desks by department. For example, you might want people to check in with a button at some desks, but scan a QR code at others. Put those desks in separate groups so each group can have its own check-in settings.
The same idea applies if some desks can be booked for a full day and others only for a morning or afternoon. Decide which desks need different rules or access before you add them to the map. That way, the right groups will already be there when you create each desk.
Follow this setup order
- Add your office and floors, such as London, Ground floor, and First floor.
- Create your types and groups, such as Desks with IT Desks and Sales Desks. Decide what rules each group needs.
- Add the actual desks and rooms, choosing the right type and group for each one.
- Give people access: create access roles, assign them to teams, and add or invite people to those teams.
The Layout of the Office
Your workplace has three levels: a location represents an office or site, each location contains floors, and each floor contains bookable spaces, such as desks, meeting rooms, or parking spots.
Create a location
- Open Settings → Workplace and click Add location.
- In General, enter a recognizable name and the location’s address. Check the timezone and other locale settings so schedules reflect the office’s local time.
- In Schedule, set the working days and opening hours.
- Review Visibility and enable only the Modules your office needs, then save the location.
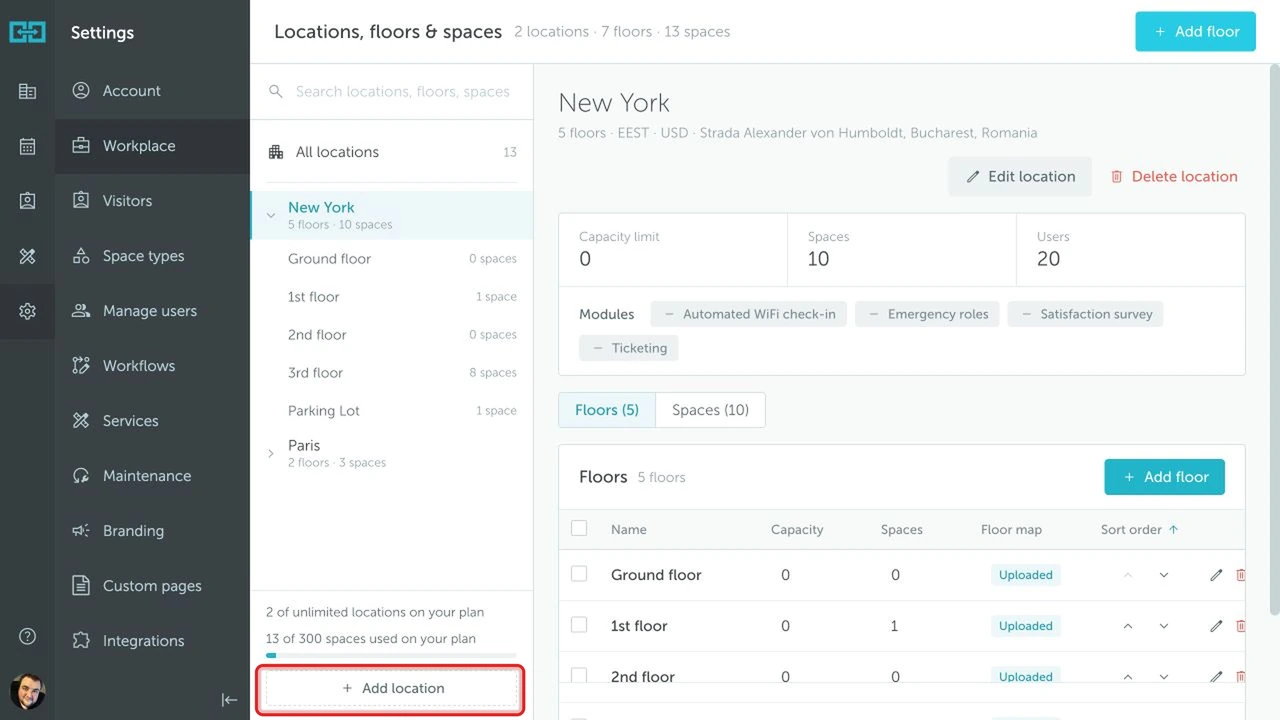
Modules include options such as automated Wi-Fi check-in, emergency roles, satisfaction surveys, and ticketing. You can return to these settings later; you do not need to enable everything to start using YAROOMS.
Add a floor
Select the location in Settings → Workplace, then click Add floor. Give it a name in General. If you have a floor plan, upload it in Floor map, then save.
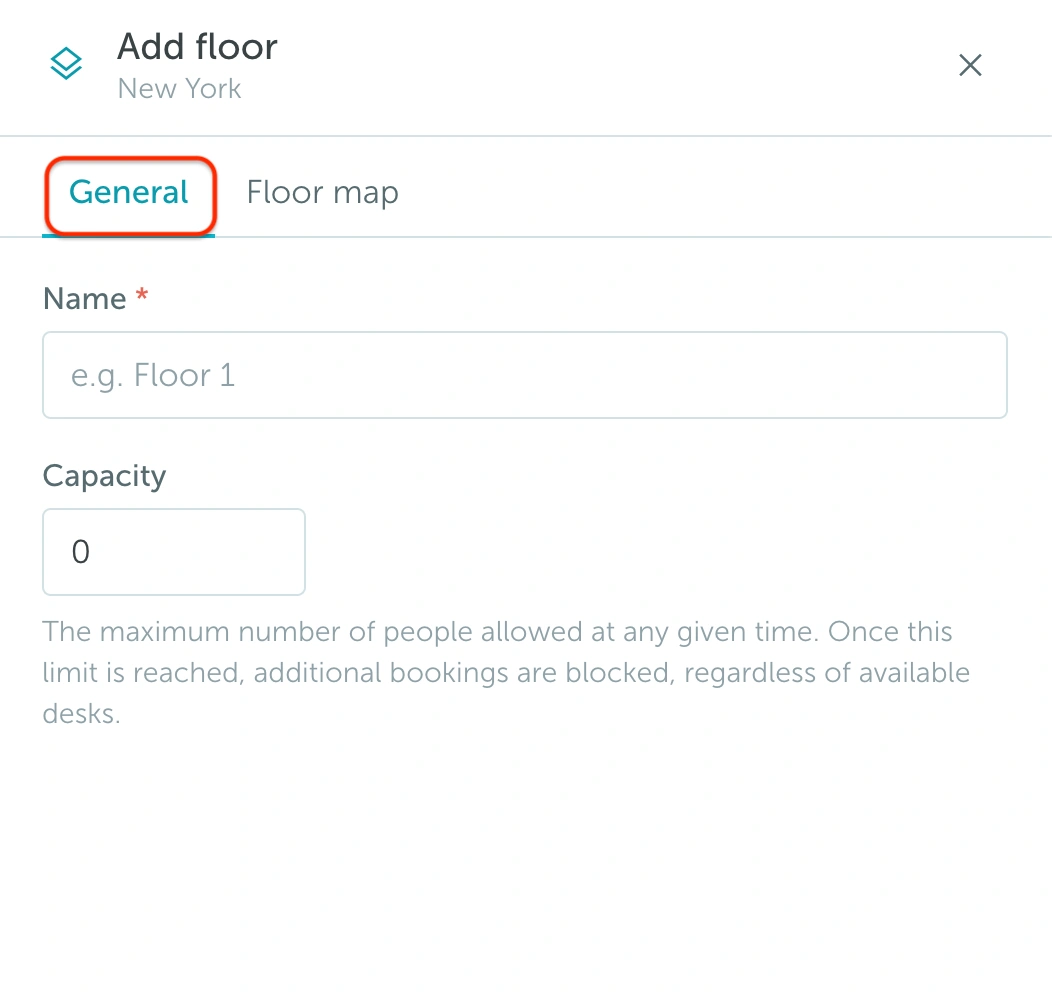
Warning: Location and floor Capacity is an optional limit on simultaneous desk bookings, not a count of the desks you have. With 50 desks and a capacity of 25, the remaining desks become unavailable once 25 are booked at the same time. Leave the default unless you intend to impose this restriction.
A floor plan is optional. Without one, users can still book spaces through Timeline. The map’s scale ratio is also optional for basic setup; it is mainly relevant to physical distancing and compound rooms.
For the full location and floor settings, see Setting up your office.
Space Types and Groups
Space types describe what a resource is. Space groups let resources of the same type share different rules. For example, a Desk type might contain Simple desks and QR desks, with different check-in requirements.
Choose the right type
Open Settings → Space types. Review existing types before adding a new one with Add space type.
In Details, set the name, plural name, and icon. Under Kind of space, choose:
- Personal space for one-person resources such as desks, lockers, and parking spots.
- Meeting space for rooms or other shared spaces reserved by one person for a group. Configure attendee and seat-capacity options where relevant.
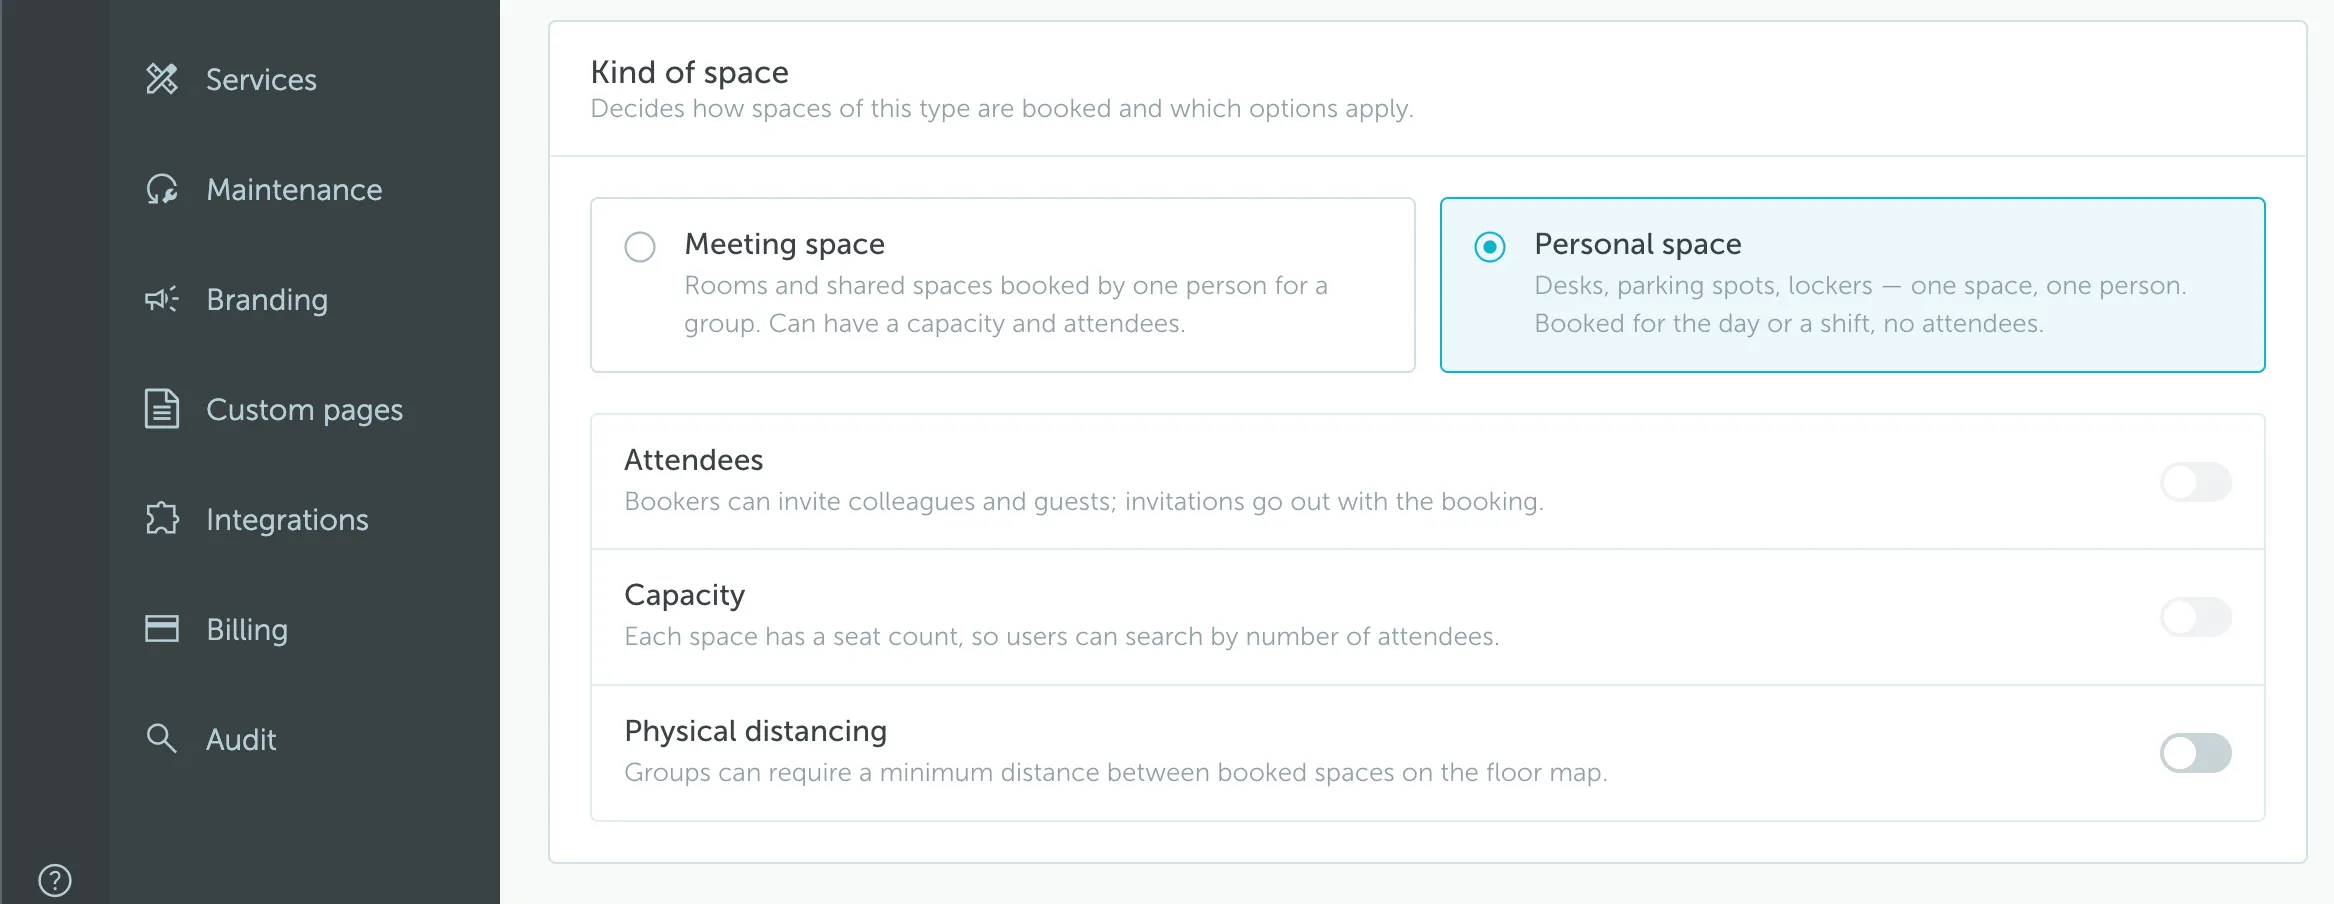
Meeting-room seat capacity describes how many attendees a room accommodates. It is different from the location or floor booking restriction described above.
Organize groups and their rules
Open a space type, select Groups, and click Add group. Name the group, then review its settings.
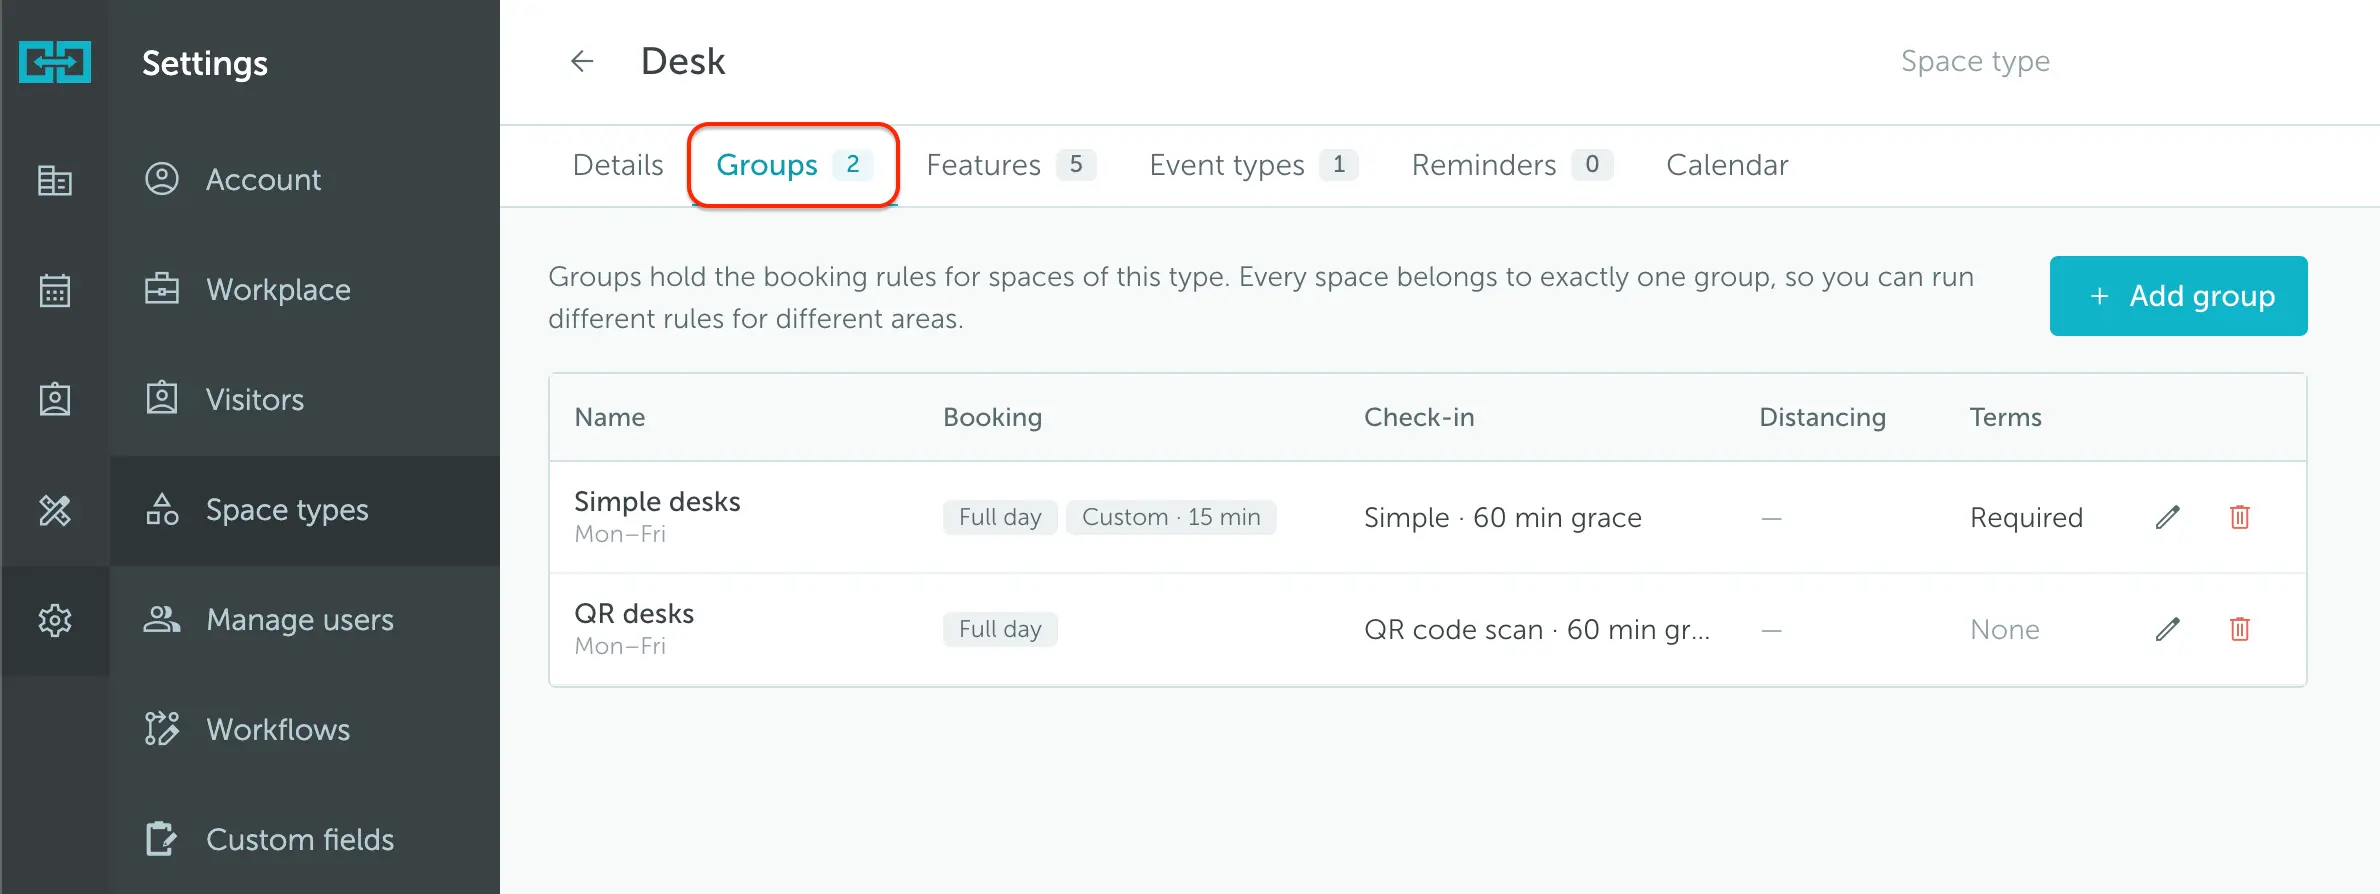
| Tab | What to decide |
|---|---|
| Details | The group name and whether space names appear on the map. |
| Booking rules | Bookable weekdays, full-day or timed bookings, intervals, buffers, and maximum duration. |
| Check-in | Whether arrival confirmation is required, the allowed methods, and the grace period before unclaimed bookings are released. |
| Distancing, when enabled | The minimum distance between booked spaces. This relies on a correctly scaled floor map. |
| Fields | Which booking fields users complete and their order. |
| Terms | Whether users must accept conditions before booking. |
Save the group and choose it when creating or editing the spaces that should follow those rules.
Note: A group's booking rules describe how and when its spaces can be booked. Access roles determine who can book them. Creating a group alone does not give users access.
Add useful features
In the space type’s Features tab, add amenities such as a monitor, standing desk, or whiteboard. Think of this as your list of feature labels for that space type. When you create or edit a desk or room of this type, you can pick from this list and assign the features it actually has. Adding a feature here makes it available to choose; it does not automatically apply it to every space. Users can then filter spaces by those features to find what they need.
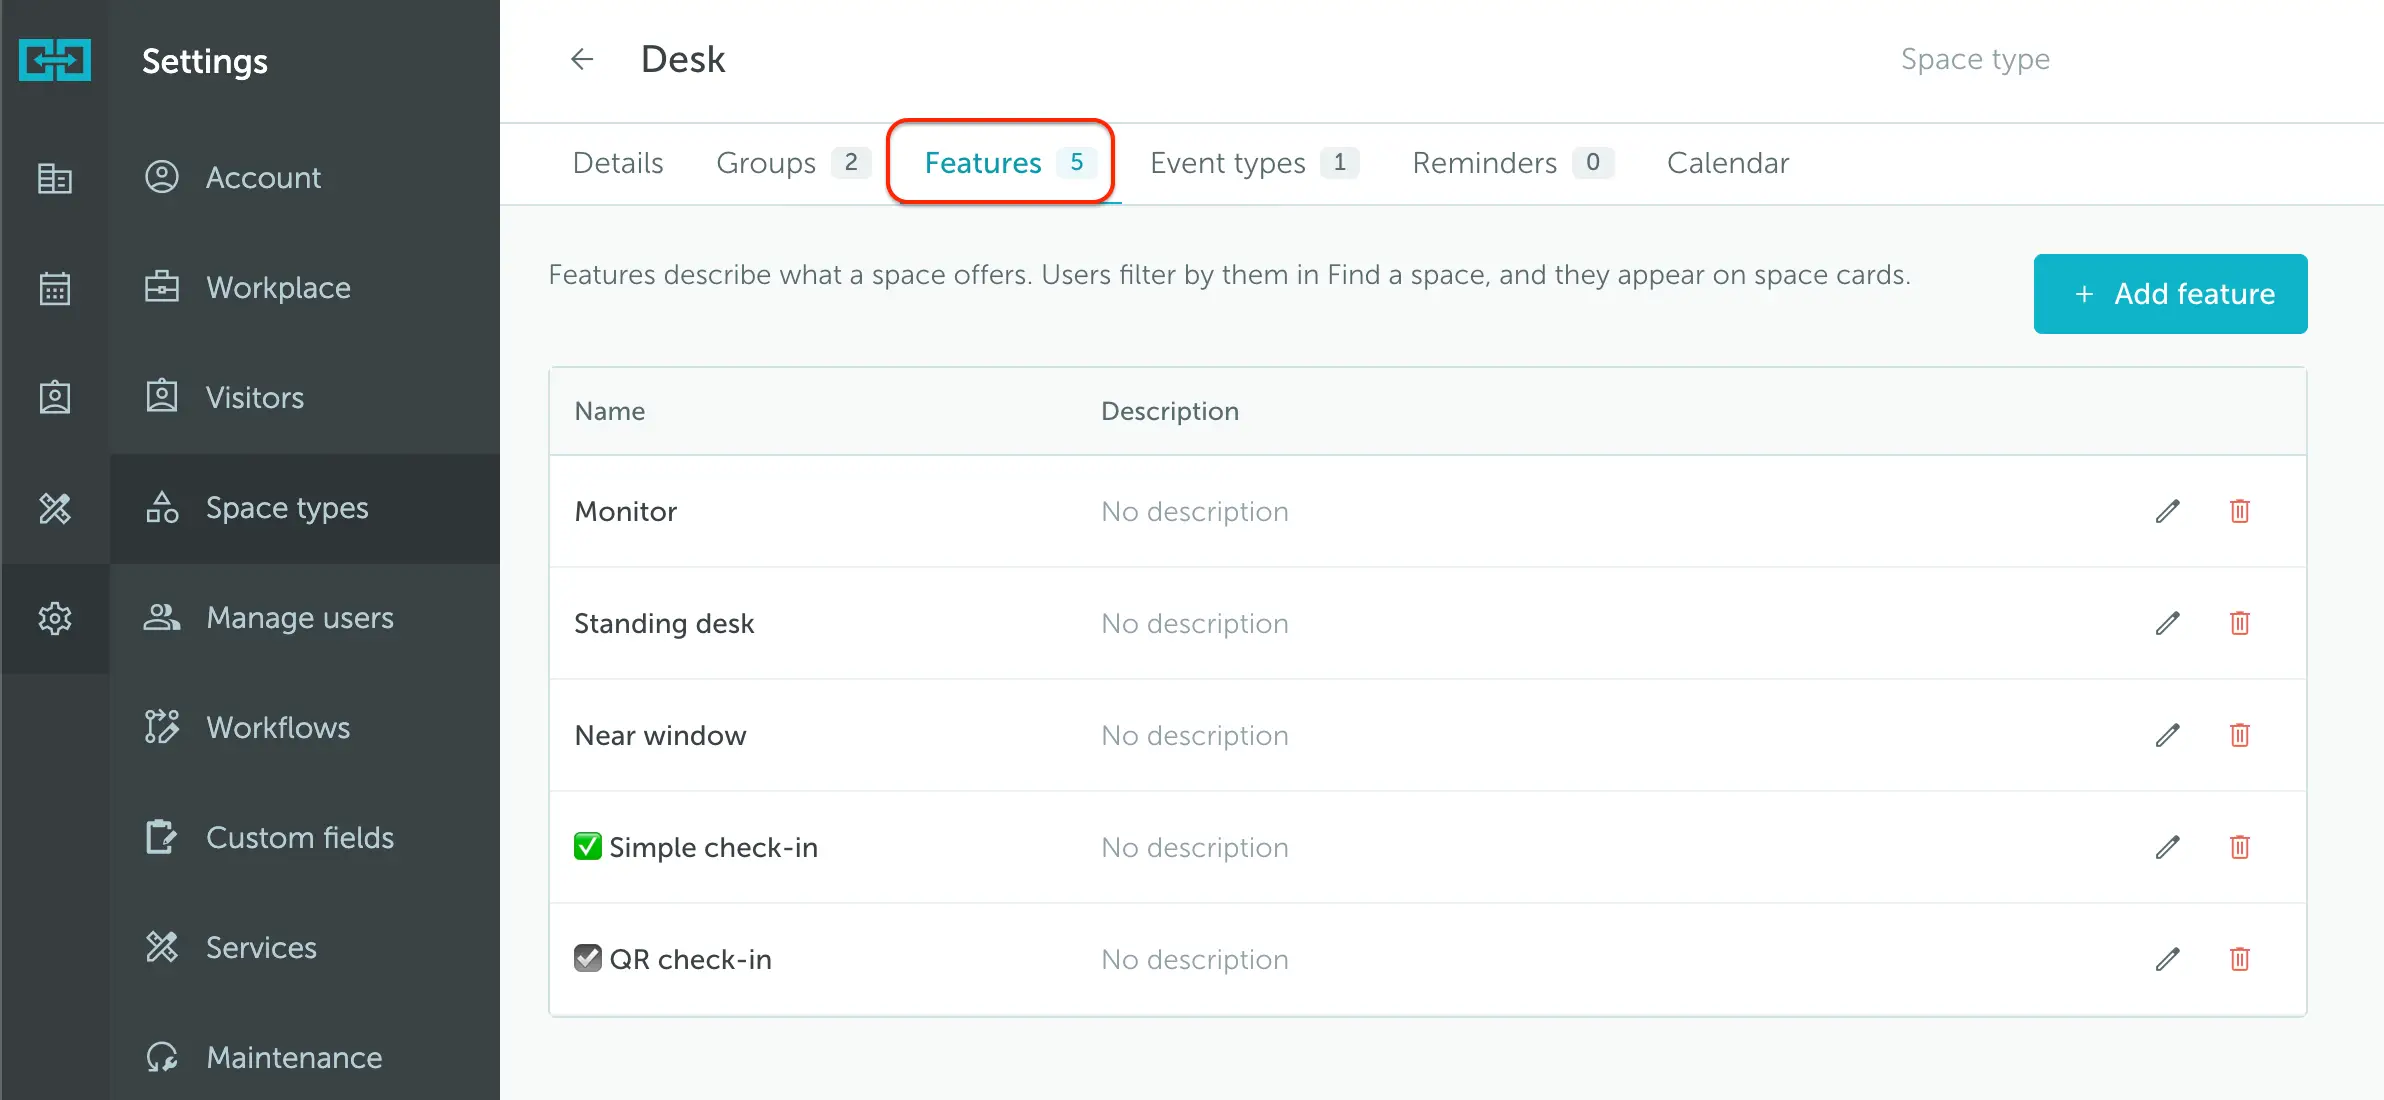
Other type-level tabs include Event types for booking labels and colors, Reminders for reminder emails, and Calendar for iCal attachments. These can be refined after your basic setup is working.
For the complete reference, see Setting up space types & space groups.
Create Spaces
With your space types and groups configured, you can now create the actual desks and rooms. Each space belongs to one type and one group: choose the options you prepared for its intended access and booking rules.
With a floor plan:
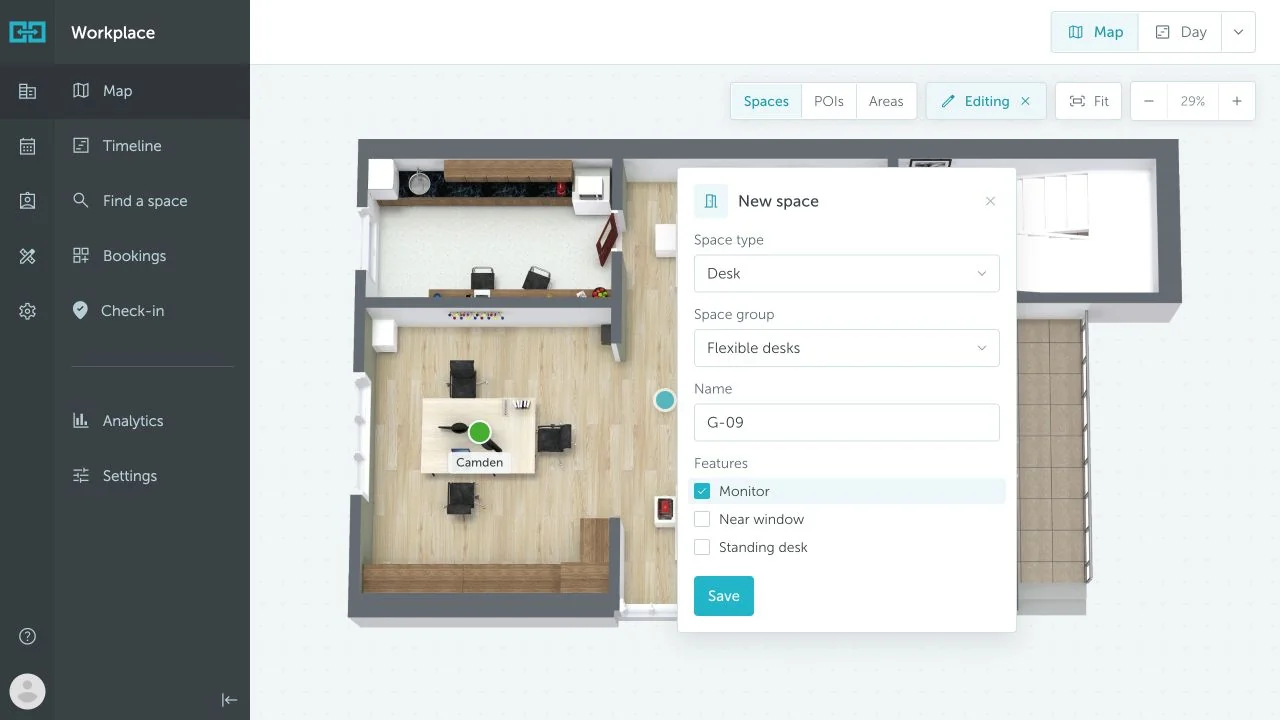
- Open Workplace → Map and select your location and floor.
- Click the pencil button to enter Edit mode, then select Spaces.
- Click the position where the desk or room should appear.
- Choose its Space type and Space group, enter a clear Name, and select its features.
- Click Save. Drag the marker to adjust its position, and leave edit mode when finished.
Without a floor plan, select the floor in Settings → Workplace and click Add space. Choose its type and group, check the location and floor, enter its name and features, and save. Leave map coordinates blank.
Use clear, consistent names such as Desk 01 or Meeting Room Thames. To change an existing space on the map, select it in edit mode. Its settings icon opens additional options such as assignments and pictures.
See Setting up your office map or Setting up your office without a map for the detailed steps.
Users
Users need both an account and the right booking access. Teams are a convenient way to give colleagues shared permissions, while personal roles handle individual exceptions.
Understand user permissions
- Regular users book within the permissions and restrictions you configure.
- Administrators manage the account, users, workplace configuration, and bookings, with broad access including billing.
- Users with selected admin permissions can handle specific tasks without full Administrator access. For example, you can let someone manage everyone’s bookings without giving them access to account management, or give someone the permissions needed to look after a particular location.
You can give any regular user specific admin permissions without making them a full Administrator. For example, someone who normally only books their own desk can also be allowed to manage other people’s bookings. See How to Assign Custom Admin Rights for the setup steps.
Give people only the permissions they need. Booking access roles determine which spaces they can book; selected admin permissions determine what they can manage.
Create an access role
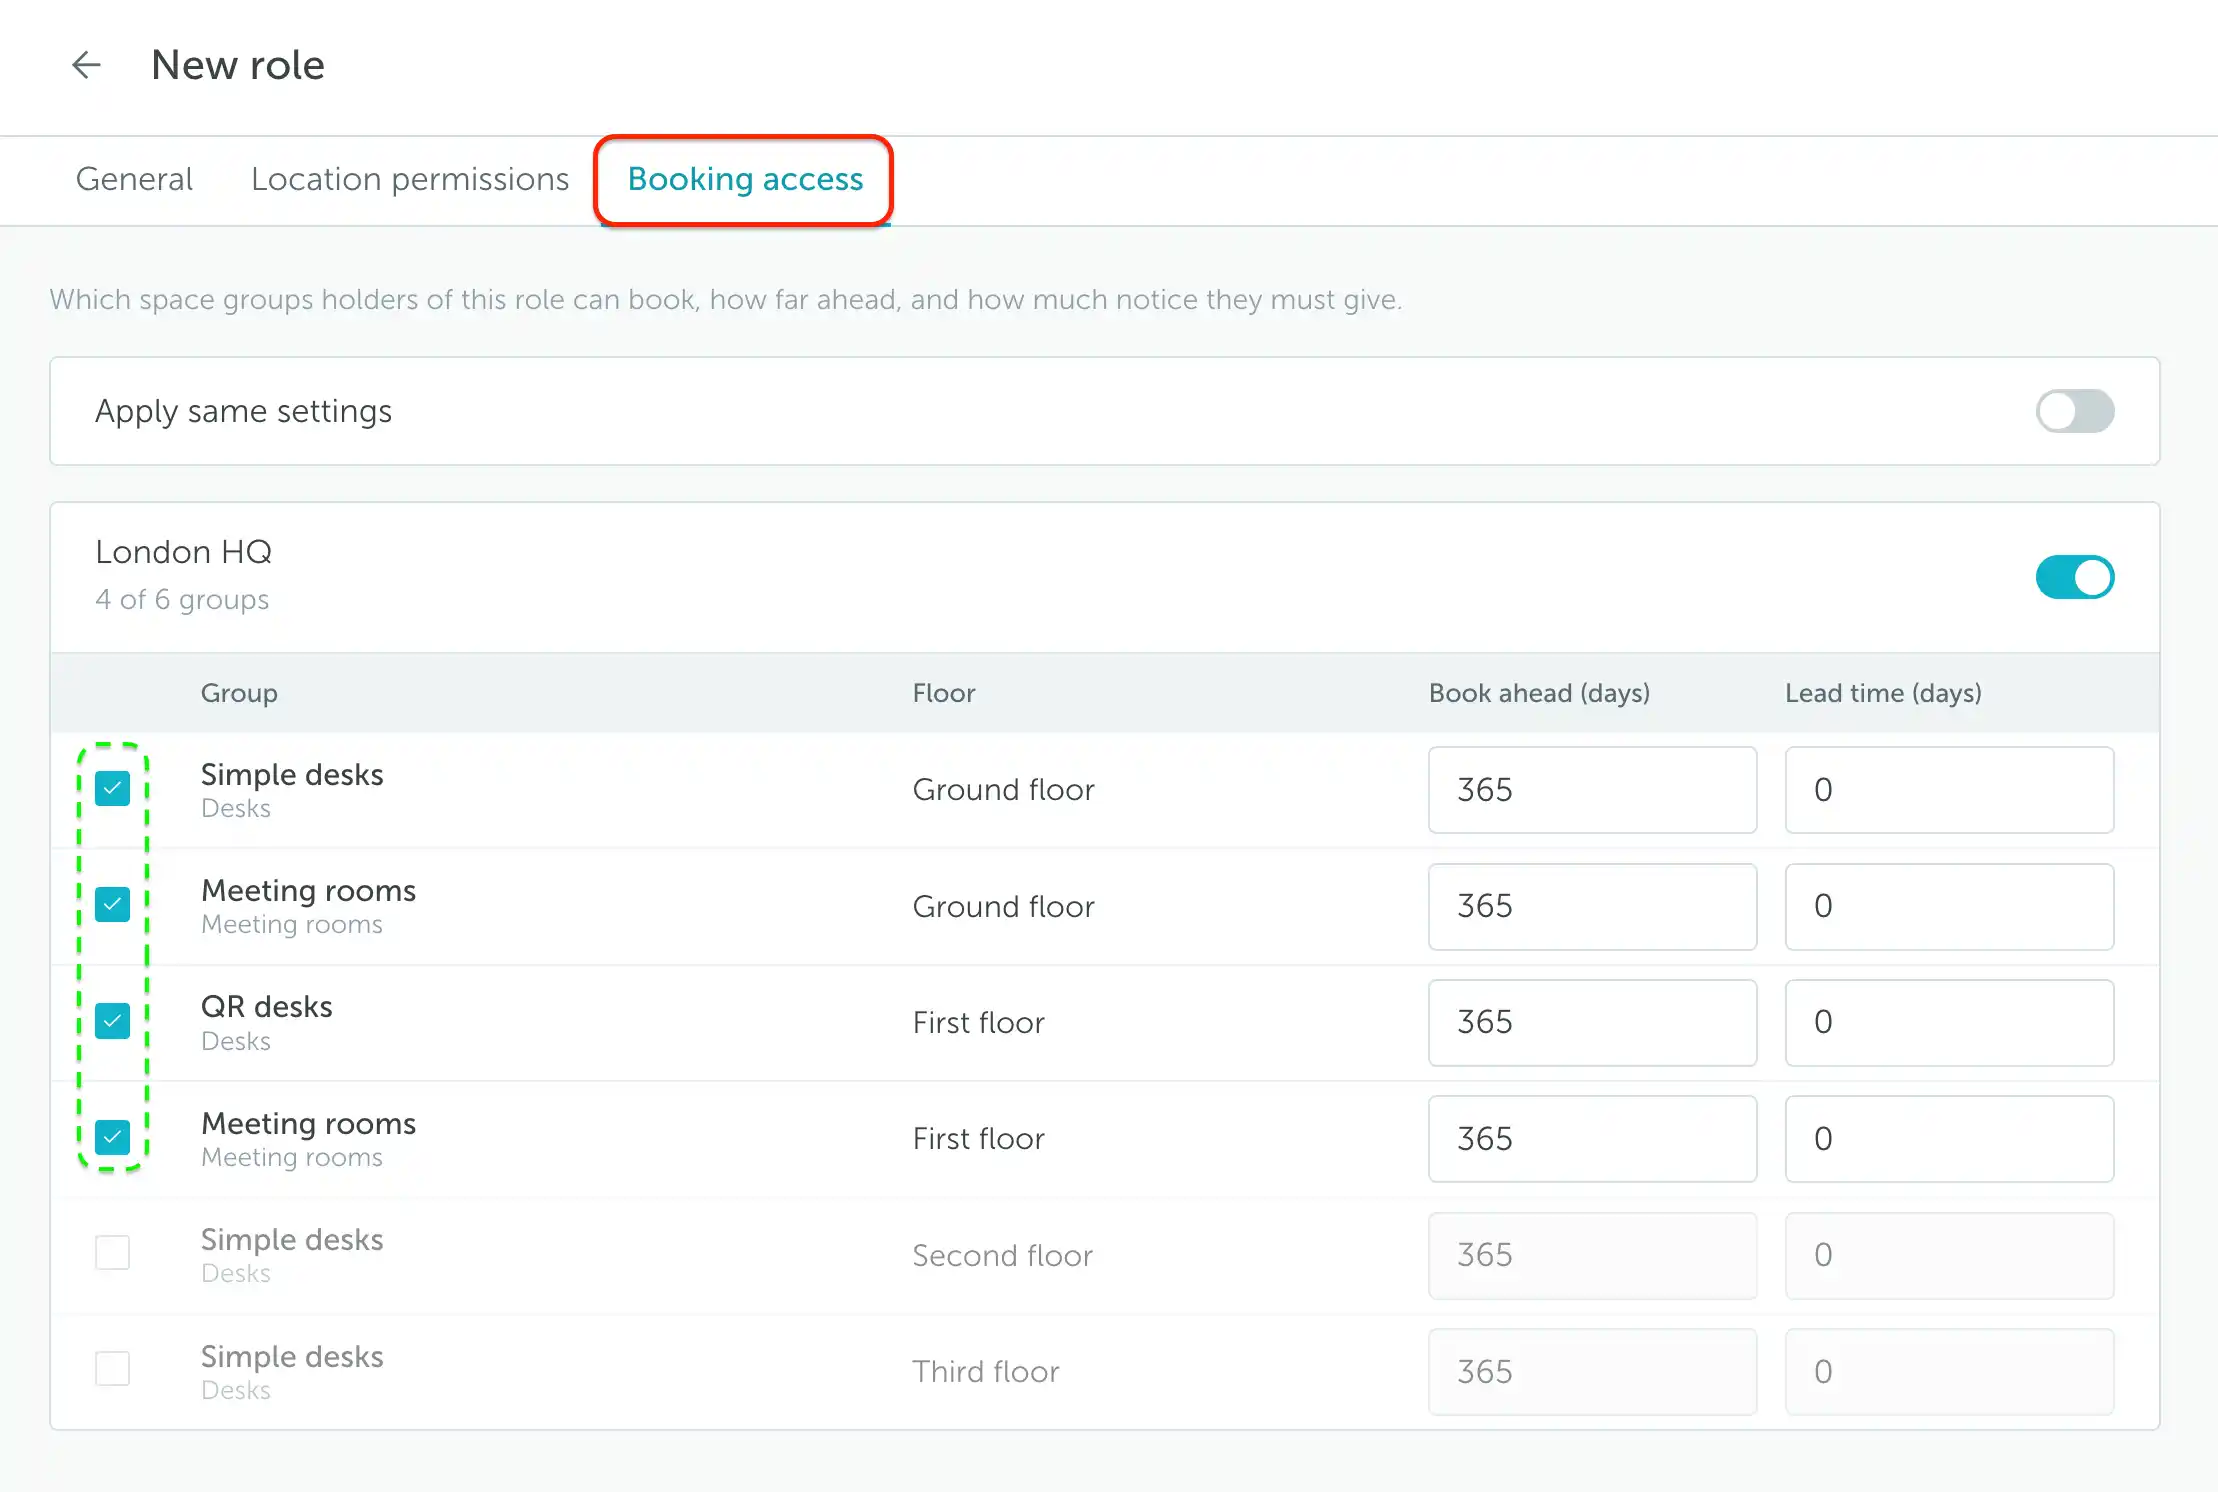
- Open Settings → Manage users → Roles and add a role.
- Give it a descriptive name in General, then open Booking access.
- Enable the relevant location and select the space groups the role should allow users to book. Check the floor for each group.
- Set Book ahead (days) to control how far into the future users can reserve those spaces. Set Lead time (days) if advance notice is required; 0 adds no advance-notice requirement.
- Save the role.
Give a team access
Open Settings → Manage users → Teams and create or edit a team. In Details, use Roles every member gets → Add a role, select the role, and save. Members inherit the team’s roles.
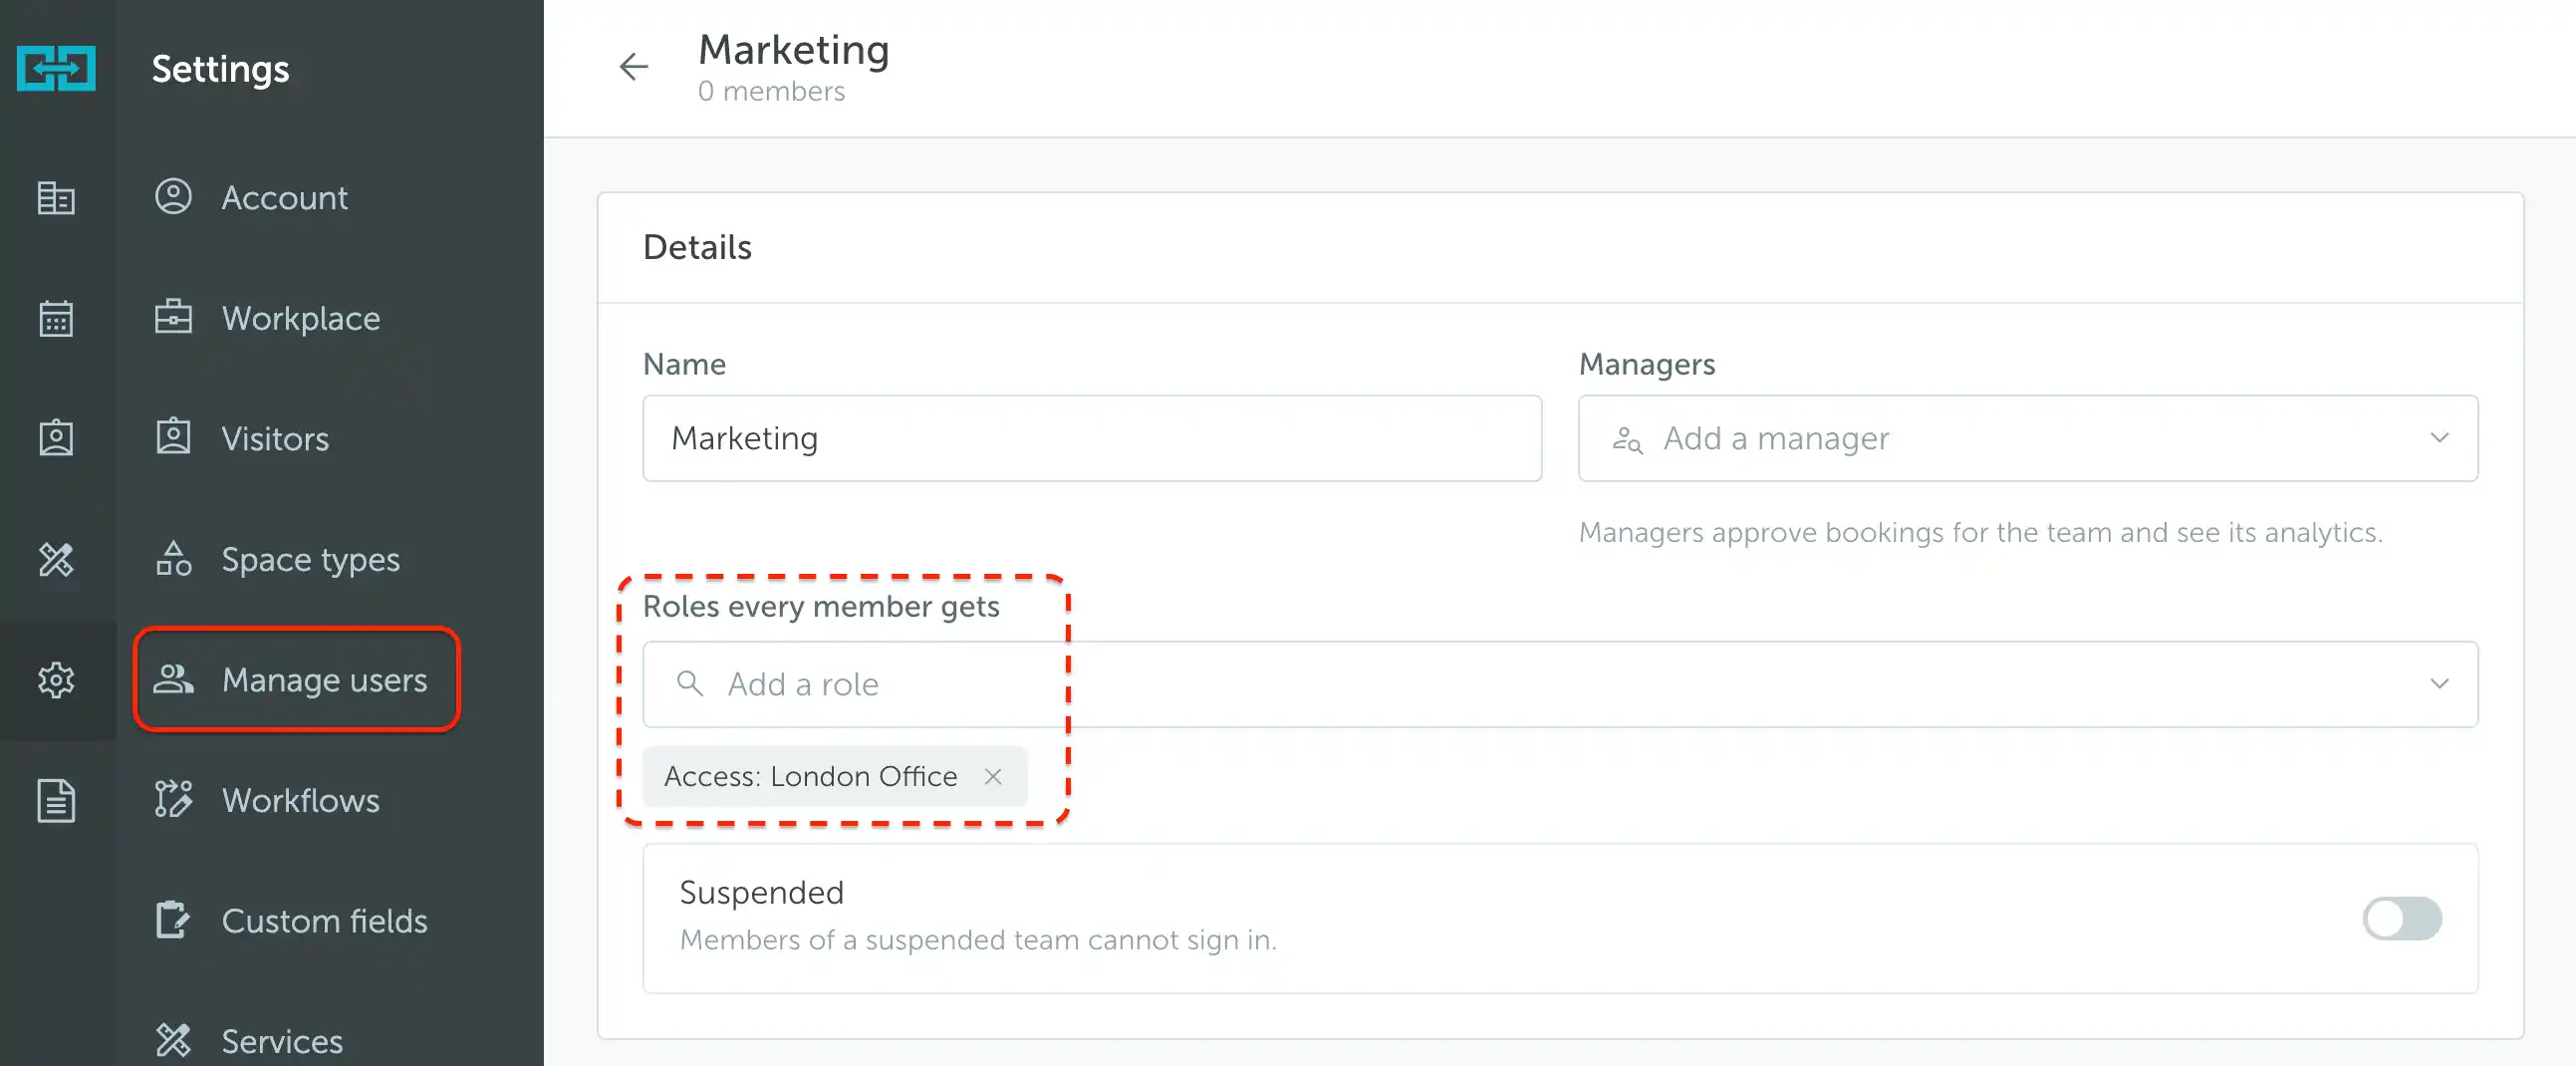
If needed, assign Managers to the team for team booking management. Keep this separate from the booking access roles that every member receives.
For individual exceptions, open a user and add a role in Roles and access.
Note: Roles add up. A personal role adds to the access inherited from the team; it does not replace or narrow it. Review both sources when checking permissions.
Add or invite users
For a straightforward onboarding flow, open Settings → Manage users → More → Invite by email. Enter the email addresses, select the location, team, and any additional roles, then click Send invitations. Each person receives a link to set up their account.
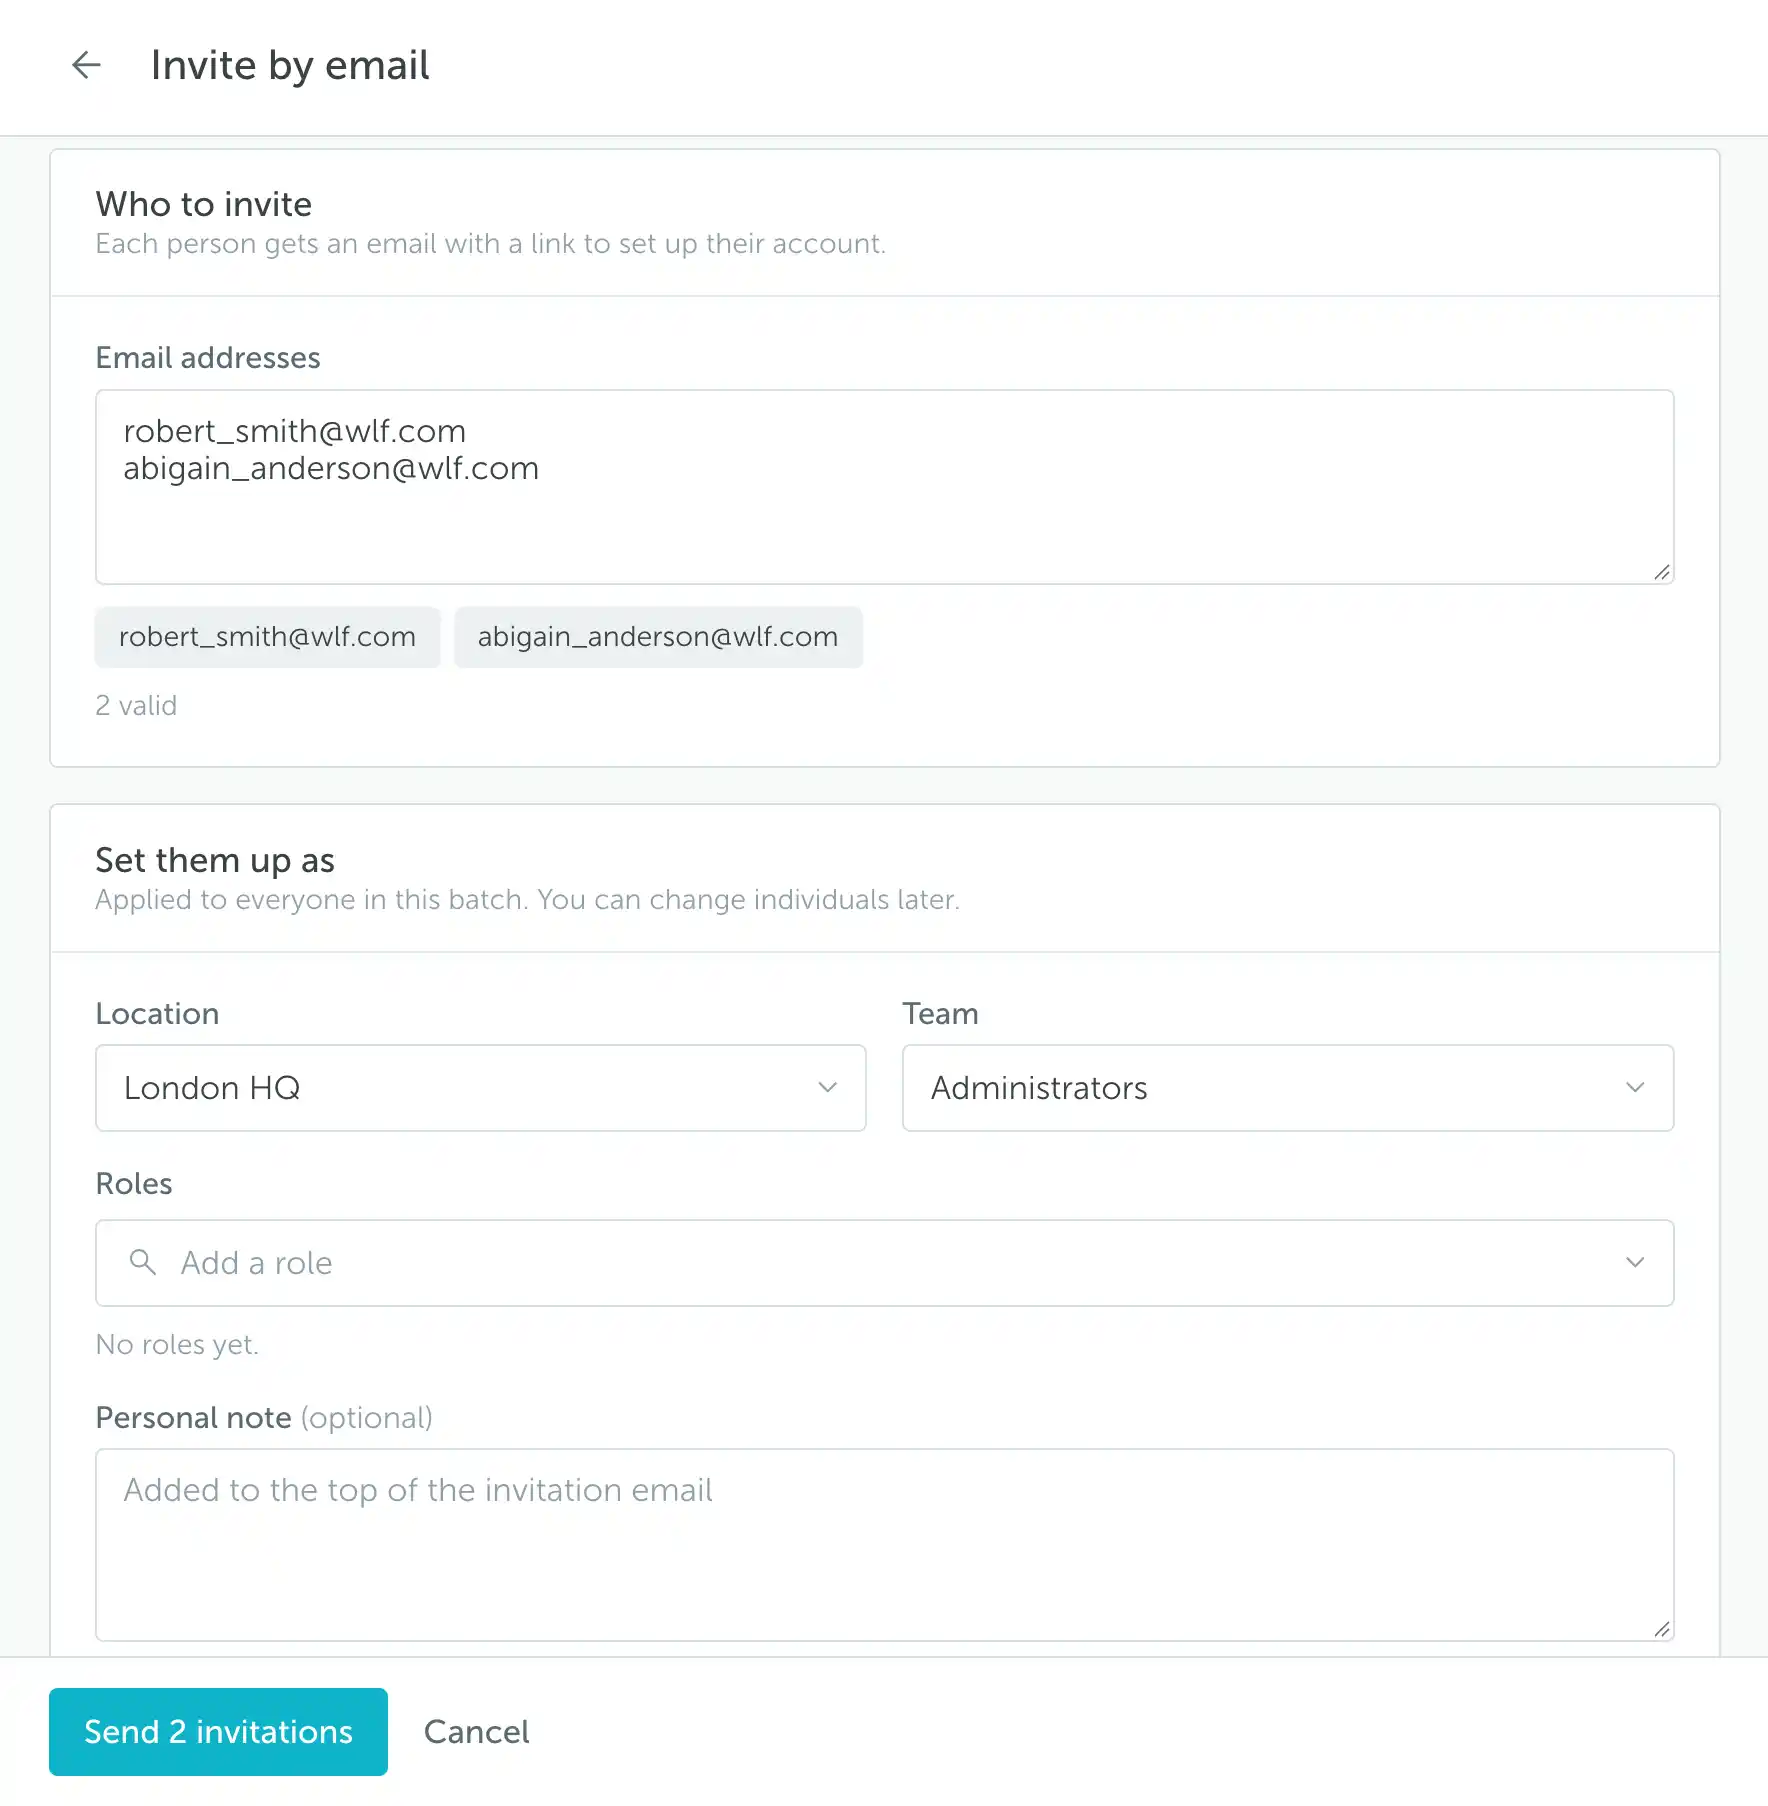
Invite separate batches when people need different teams or access. Alternatively:
- Add user creates an individual account: complete Profile, choose the location, floor, and team in Workplace, then review Roles and access and save.
- More → Import from CSV is useful for larger batches. Download the sample, upload your completed file, and correct any red-highlighted errors in the review table before importing.
See Adding New Users and Understanding User Types and Setting up user access for more detail.
Check the setup before rolling it out
Confirm that a regular user in your pilot team can see the intended location and spaces, book within the expected window, and complete any required check-in. An Administrator account is not a reliable test of regular-user restrictions because it has broader access.
Once the basics work, invite the rest of your users and share the End User Training Guide. You can introduce advanced settings later without making them part of everyone’s first day.
Your workplace is ready. Time to welcome your team to YAROOMS.