
Jump to:
1. How to book a space using the map view
Open Workplace → Map to choose a space in a specific area of the office. Select your location, floor, and date, then click a space marker to view its availability and features. Green markers indicate available spaces.
In the example below, Desk #5 is Free all day. Its card shows the available time intervals and features. Click Book to instantly reserve the space as shown, for the full day or available interval. Hover over Book to see the exact time range it reserves. Your administrator chooses this range for each space group (see Instant booking).
To adjust the dates, time interval, or other booking details before reserving, click More options to open the booking panel and follow the steps below.
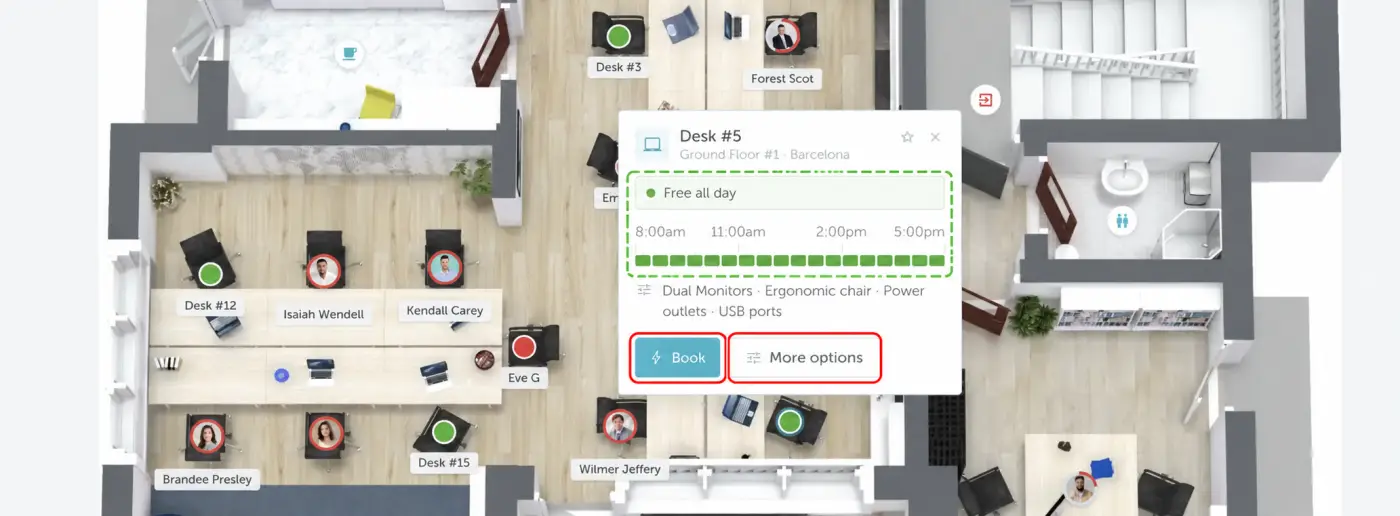
Daily view. Under Pick dates, select the day or days you want to book. Use the arrows to browse dates.
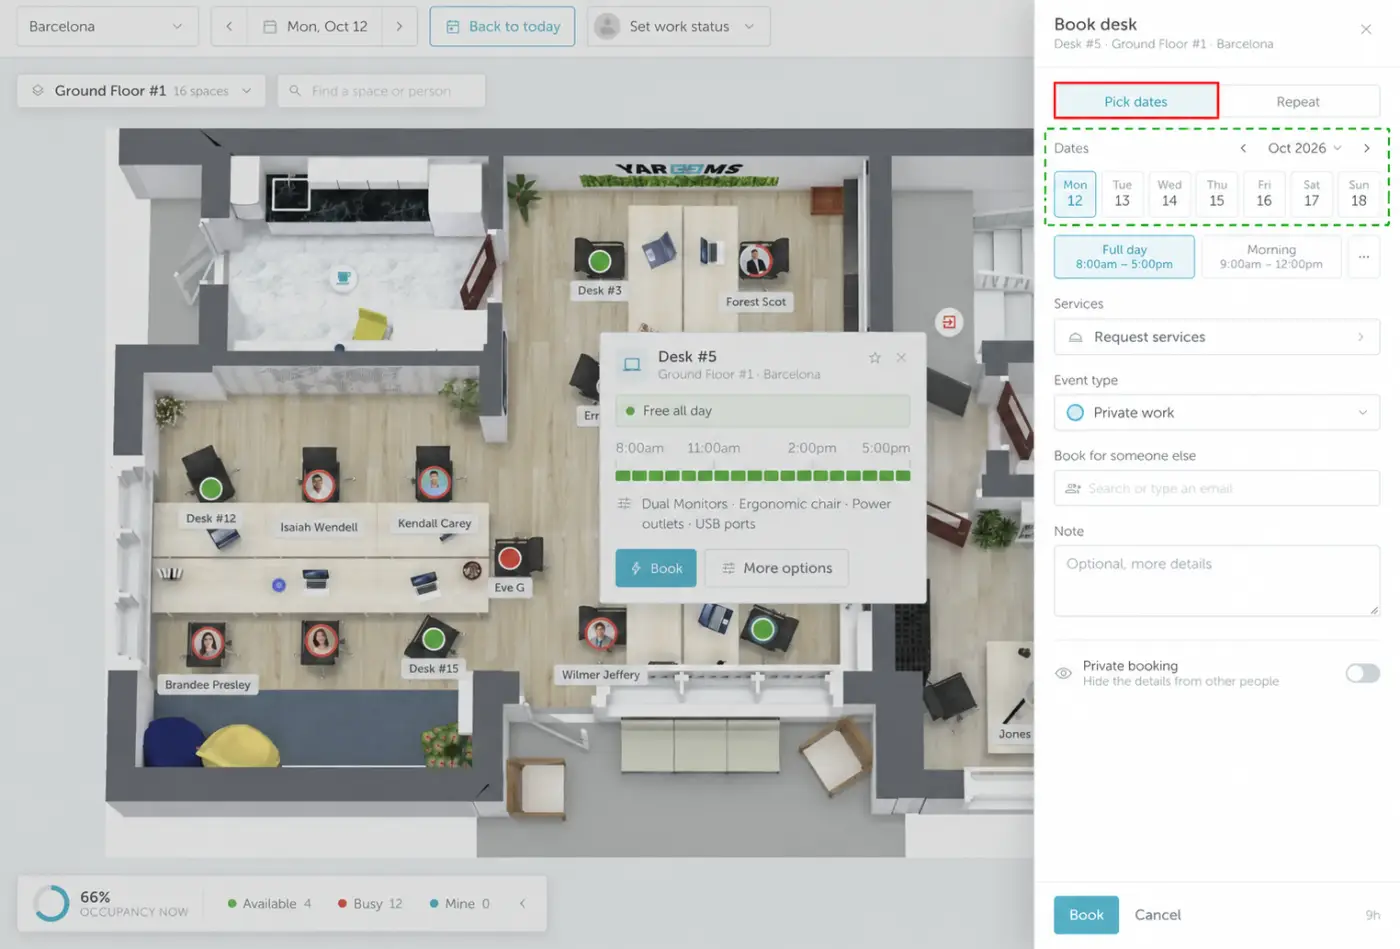
Calendar view. Click the month heading to open the calendar, then select your booking dates. Click the heading again to return to the daily view.
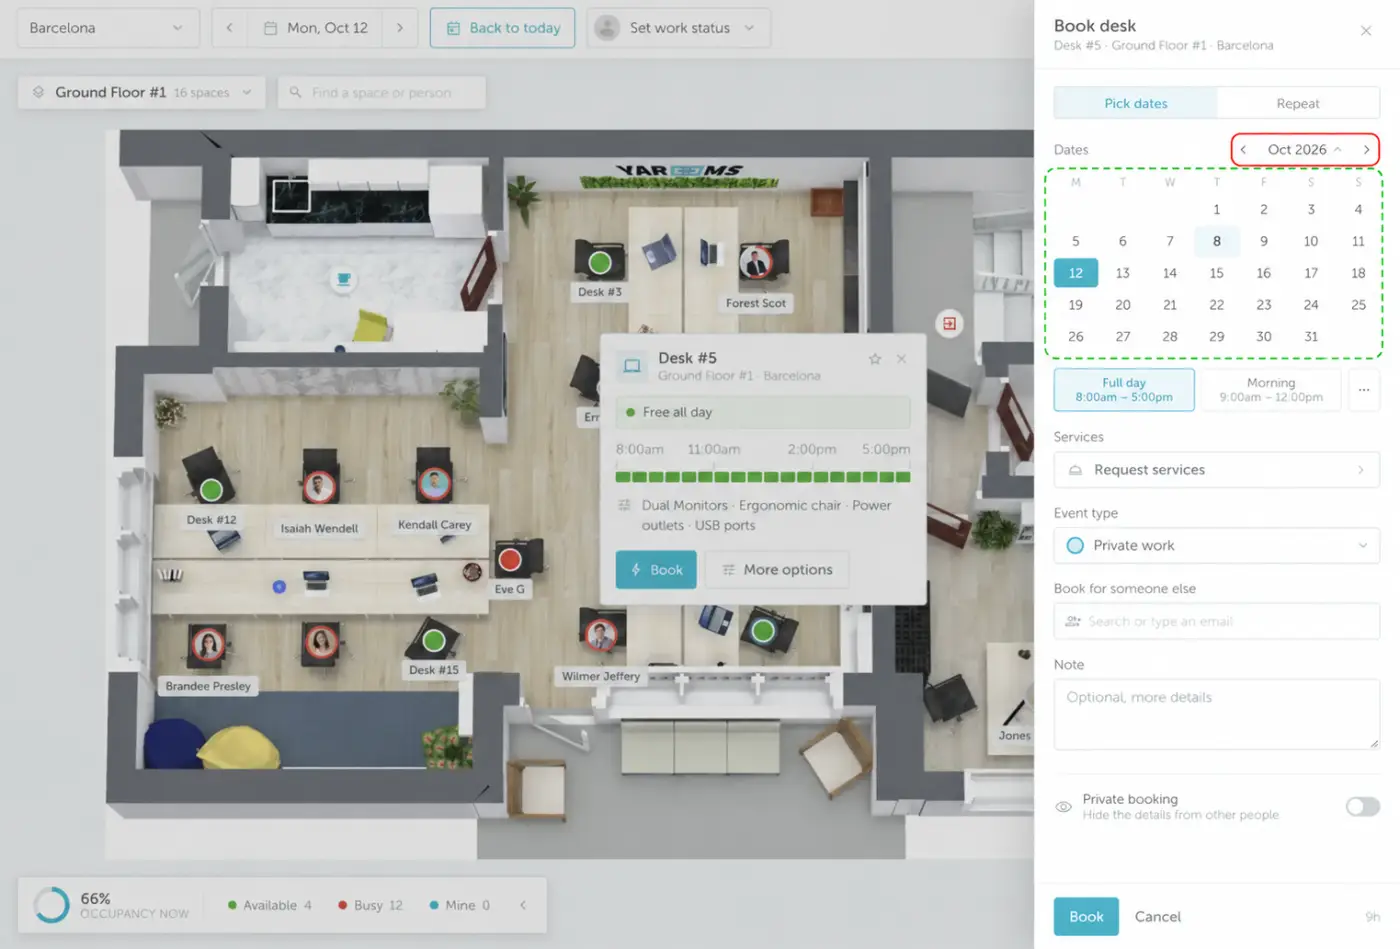
Choose the booking time that suits you: Full day, an interval predefined by your organization, or your own Custom start and end time. For recurring bookings, select Repeat and follow the recurring booking instructions.
Complete the booking details. Choose an Event type and add an optional Note. Other options may include Request services, Book for someone else, and Private booking, depending on your permissions and the selected space.
Event types label bookings and assign colors that help distinguish them in the timeline. Open the Event type dropdown and choose the appropriate option. The example below has Private work selected; the list of event types depends on your organization’s setup.
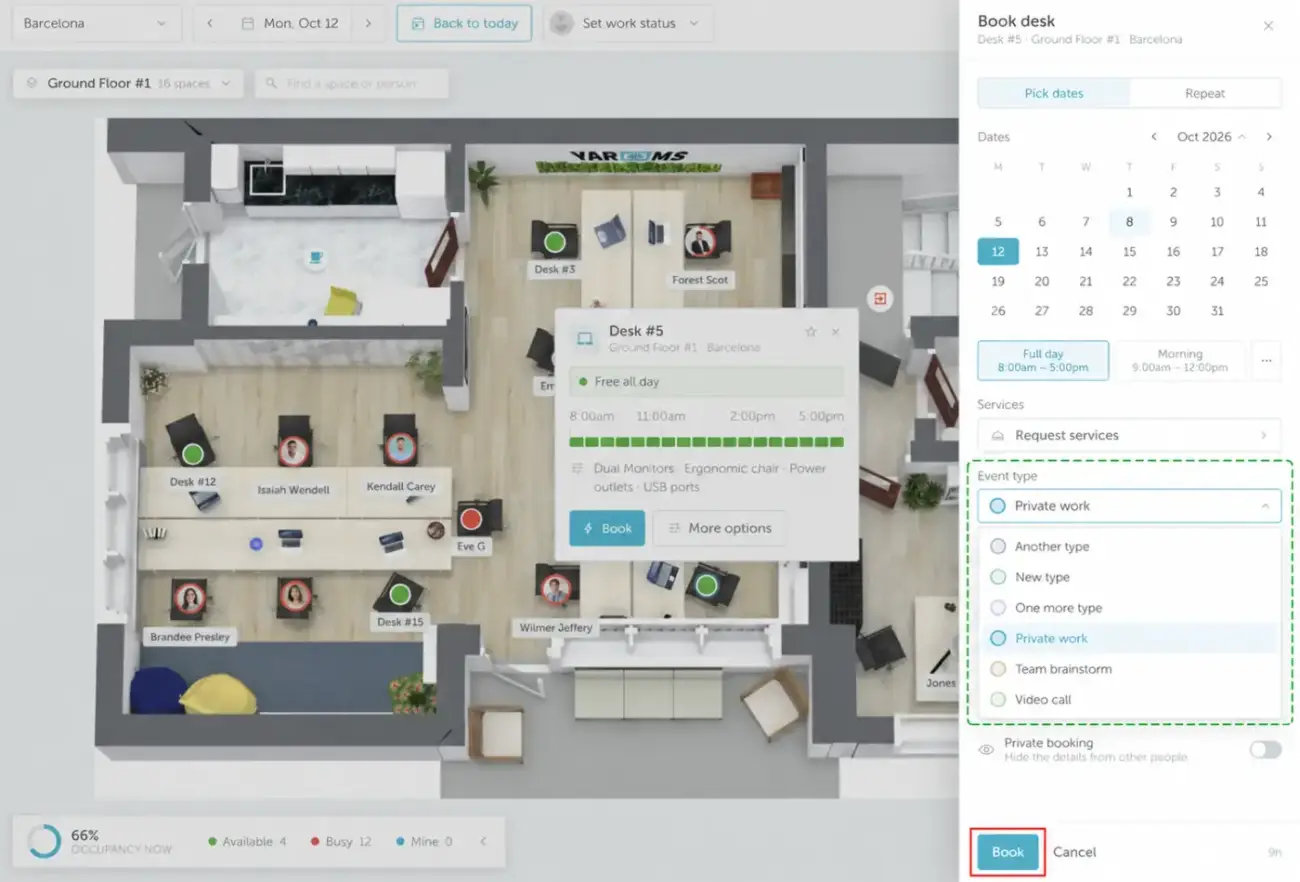
Click Book at the bottom of the panel to complete your reservation. You can review it under Workplace → Bookings, and a confirmation will be sent by email.
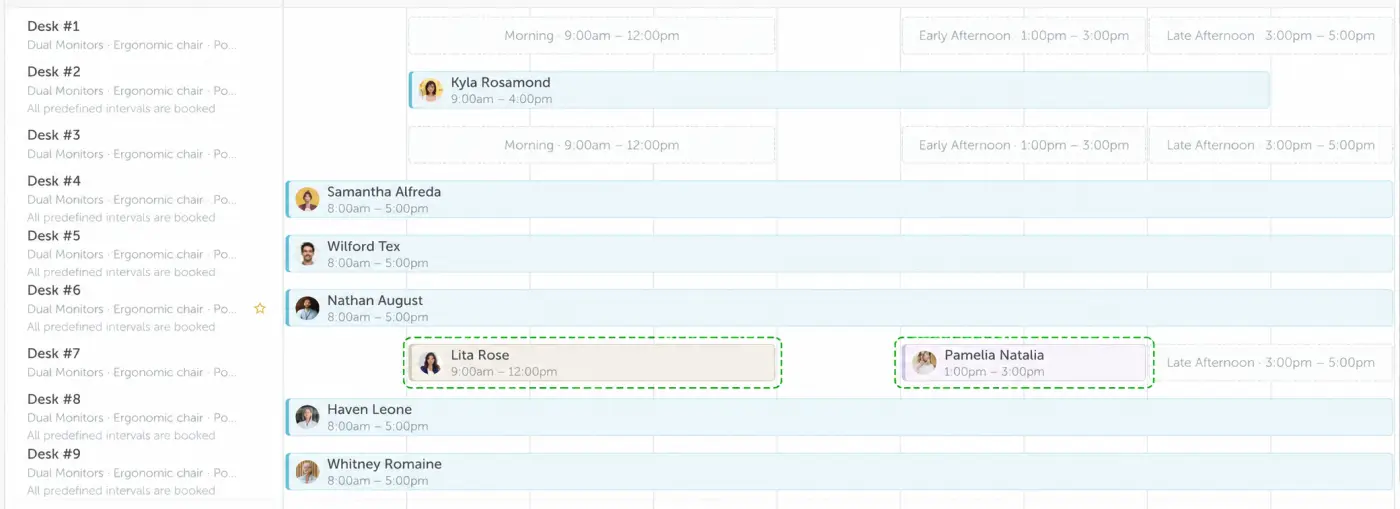
The timeline below illustrates how bookings appear in different colors according to their event types.
2. How to book a space using the timeline view
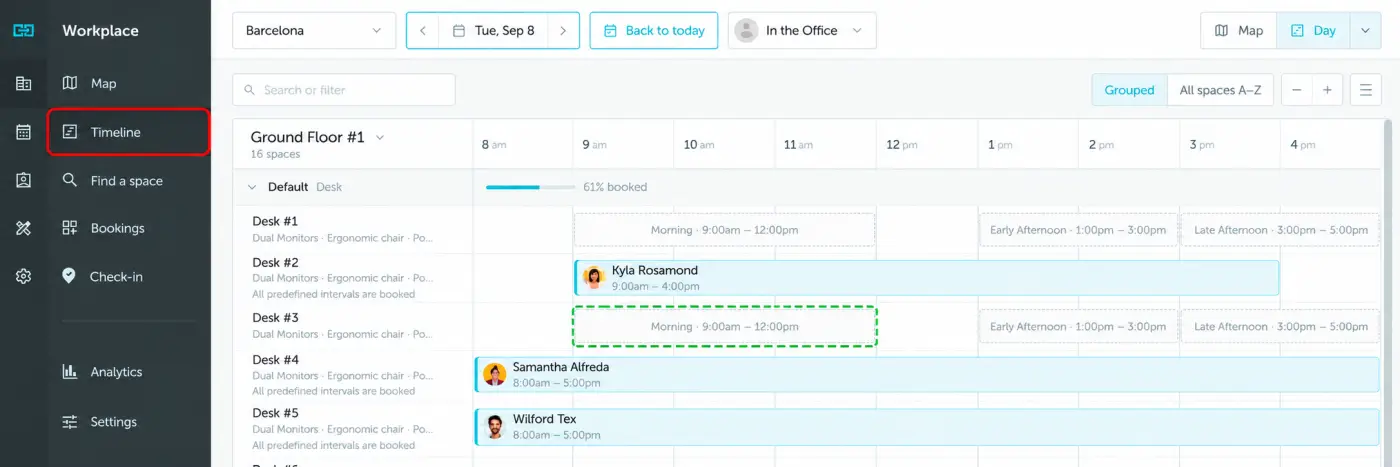
Open Workplace → Timeline to see spaces’ availability across the day. Select your location, floor, and date, then find the row for the space you want to book.
Click an available time interval in that row. In the example below, Desk #3 has a Morning interval available from 9:00am to 12:00pm.
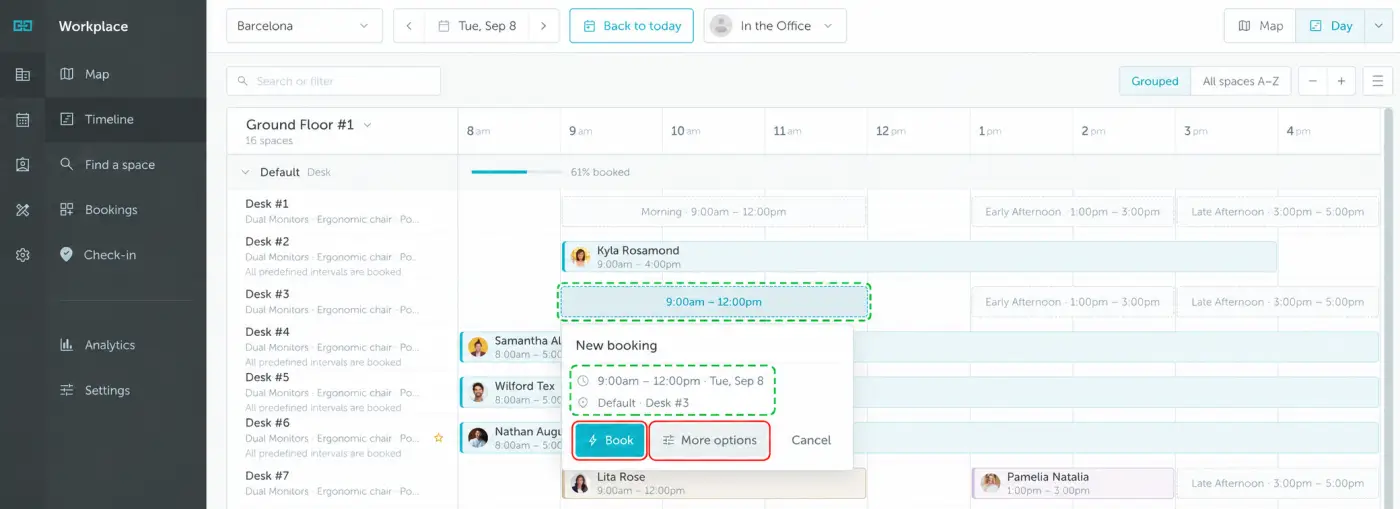
A New booking popup shows the selected space, date, and interval. Check these details before continuing.
- Click Book to instantly reserve the space for the displayed interval. In this example, Desk #3 is booked from 9:00am to 12:00pm.
- Click More options to open the booking panel and customize the dates, time interval, event type, and other available booking details. Follow the booking panel steps in the map view section, then click Book at the bottom of the panel to confirm.
You can review your reservation under Workplace → Bookings, and a confirmation will be sent by email.
3. How to book a space using “Find a space” option
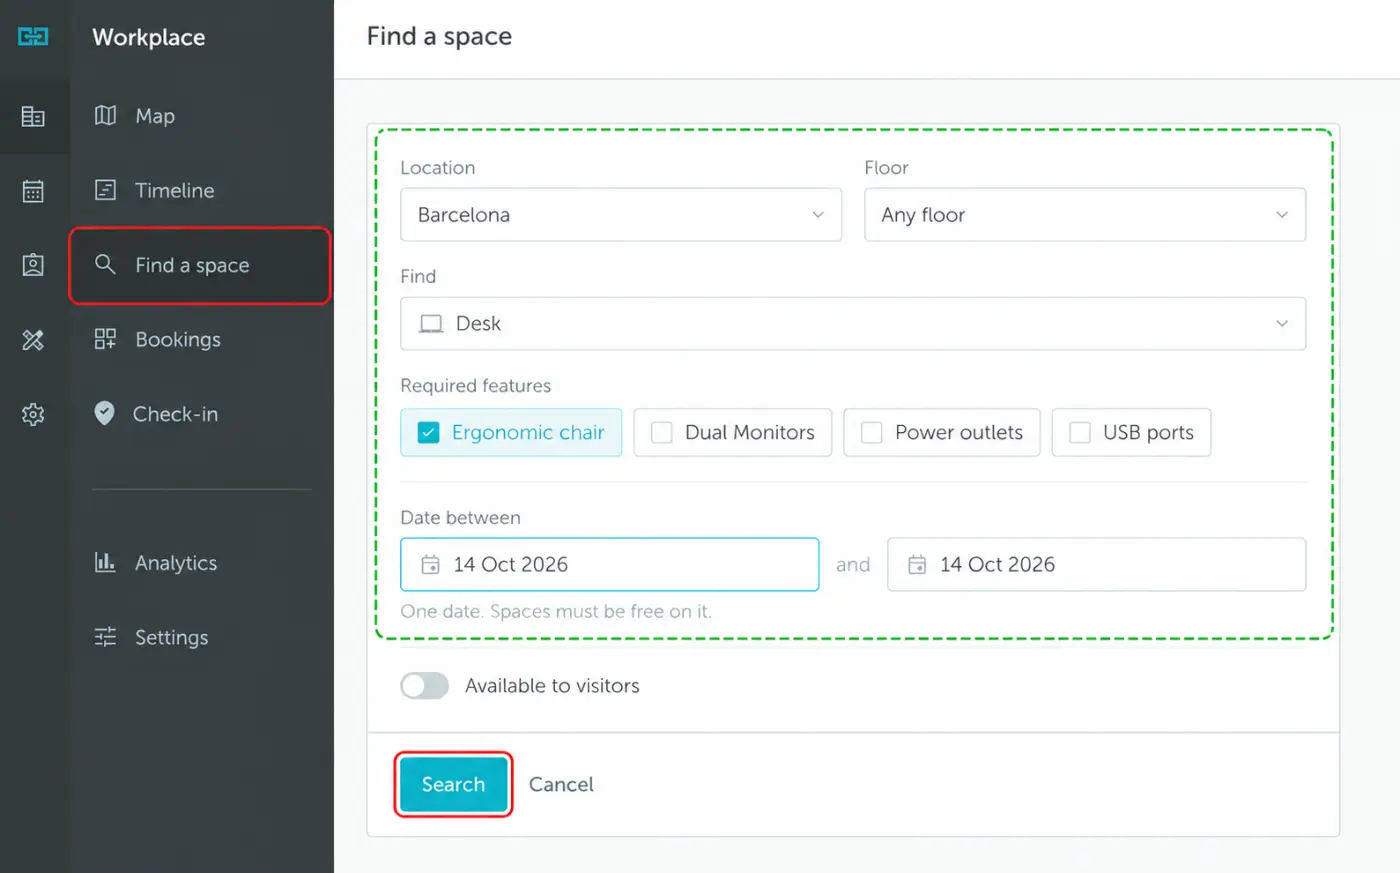
Use Workplace → Find a space to find available spaces that match your location, dates, and required features.
Set your search criteria:
- Choose a Location and Floor, or leave Any floor selected to search across floors.
- Under Find, select the space type, such as Desk.
- Select any Required features you need.
- Set the start and end dates under Date between. For a single day, use the same date in both fields.
- If you need a space that visitors can use, enable Available to visitors.
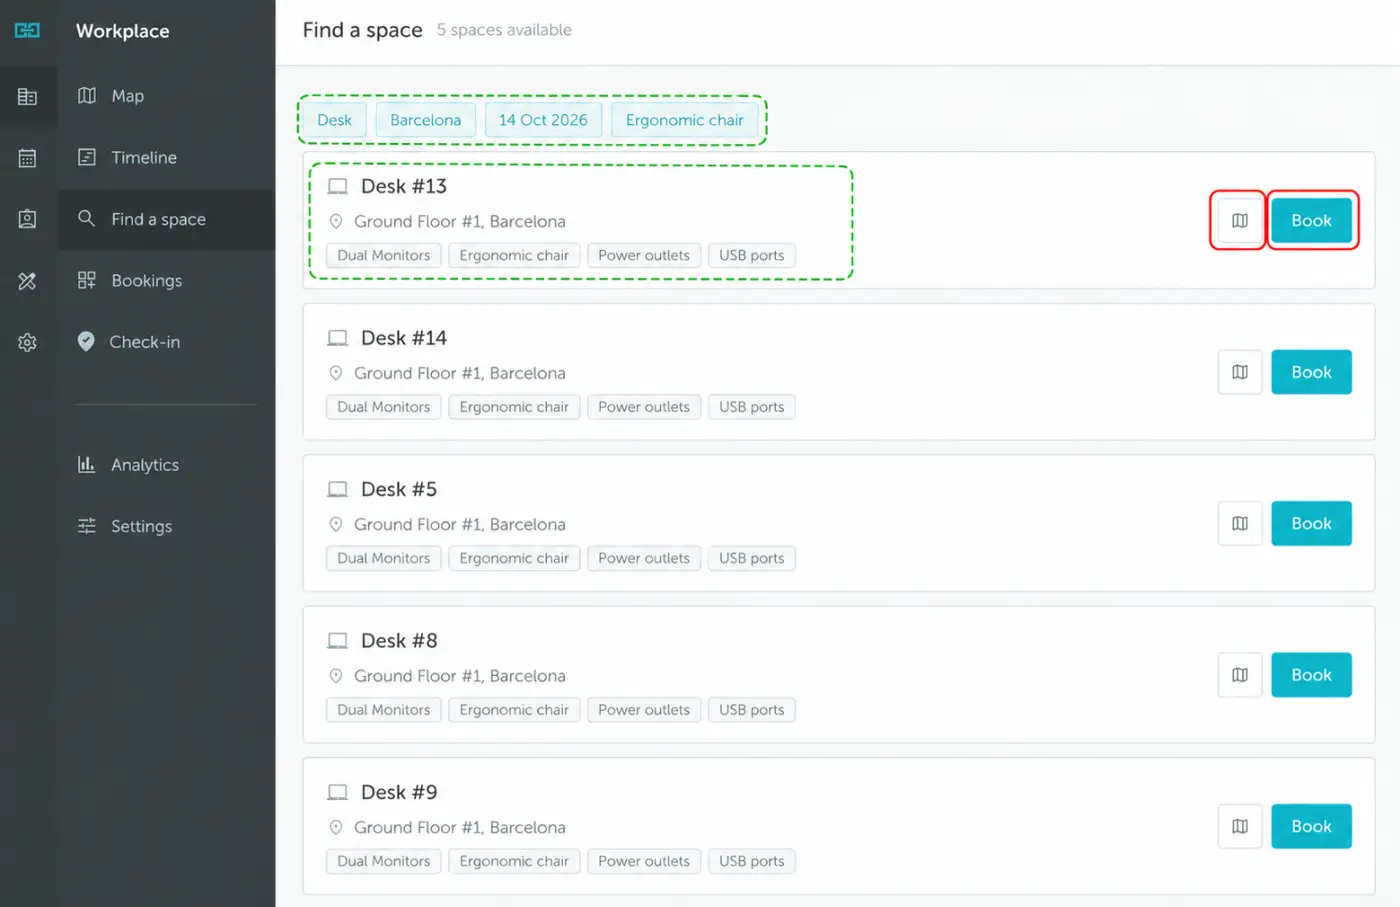
Click Search. The example below searches for a desk in Barcelona, on any floor, with an Ergonomic chair, for 14 October 2026.
The results show available spaces that match your criteria. The filter chips at the top summarize your search. Each result lists the space’s name, floor, location, and features.
Use the map icon beside a result to view its position on the floor map. Click Book beside your chosen space to continue with the reservation. Review the booking dates, time, and other details in the booking panel, following the booking panel steps in the map view section, then click Book to confirm.
You can review the reservation under Workplace → Bookings, and a confirmation will be sent by email.
For more search options, see Finding a Space.
4. How to book a space using the calendar view
If you want to book a space using the Calendar view, go to Workplace → Calendar and press the + button which will appear when you hover on the selected day (if you are using the weekly or monthly calendar views) or your name (if you are using the daily view). Then, press “Book”. Proceed with the booking process, just as in the Map or Timeline view.
We will send you an email with booking confirmation. The booking will also appear on your Calendar.
5. How to invite attendees
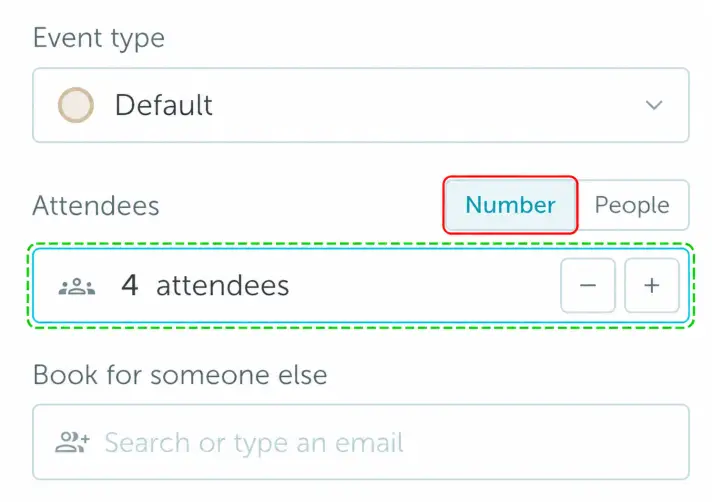
When booking a meeting room or another space that supports attendees, use the Attendees section in the booking panel. Choose Number to specify a headcount or People to add named attendees and send invitations.
Set an attendee count. Keep Number selected and use the − and + controls to adjust the number of attendees. The example below specifies 4 attendees. A count alone does not identify people to invite.
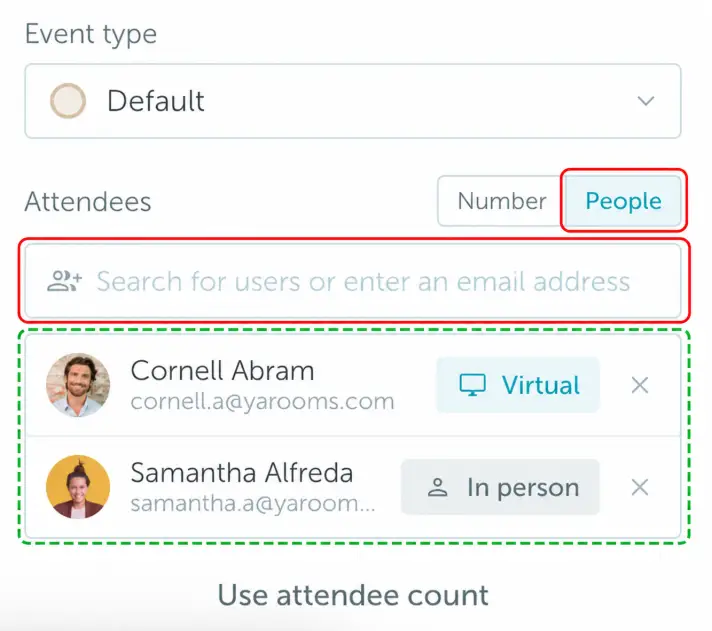
Invite specific people. Select People, then use Search for users or enter an email address to find colleagues by name or add an external attendee by email. Add each person to the list.
Each attendee can be marked as In person or Virtual, depending on whether they will attend at the office or remotely. In the example below, Cornell Abram is marked Virtual, and Samantha Alfreda is marked In person. Use the × beside a person to remove them. Click Use attendee count to switch back to specifying a headcount.
Complete the other booking details and click Book to create the reservation and send the invitations.
After the booking is created, each invited attendee receives an email with options to confirm their attendance: Attending in person, Attending virtually, or Decline. No login is required; confirmation takes one click.
If your organization uses Visitor Management, only attendees who confirm physical attendance will receive a visitor registration invitation (QR code or registration link). Virtual attendees and those who have not responded will not receive visitor management emails.
6. How to create a recurrent booking
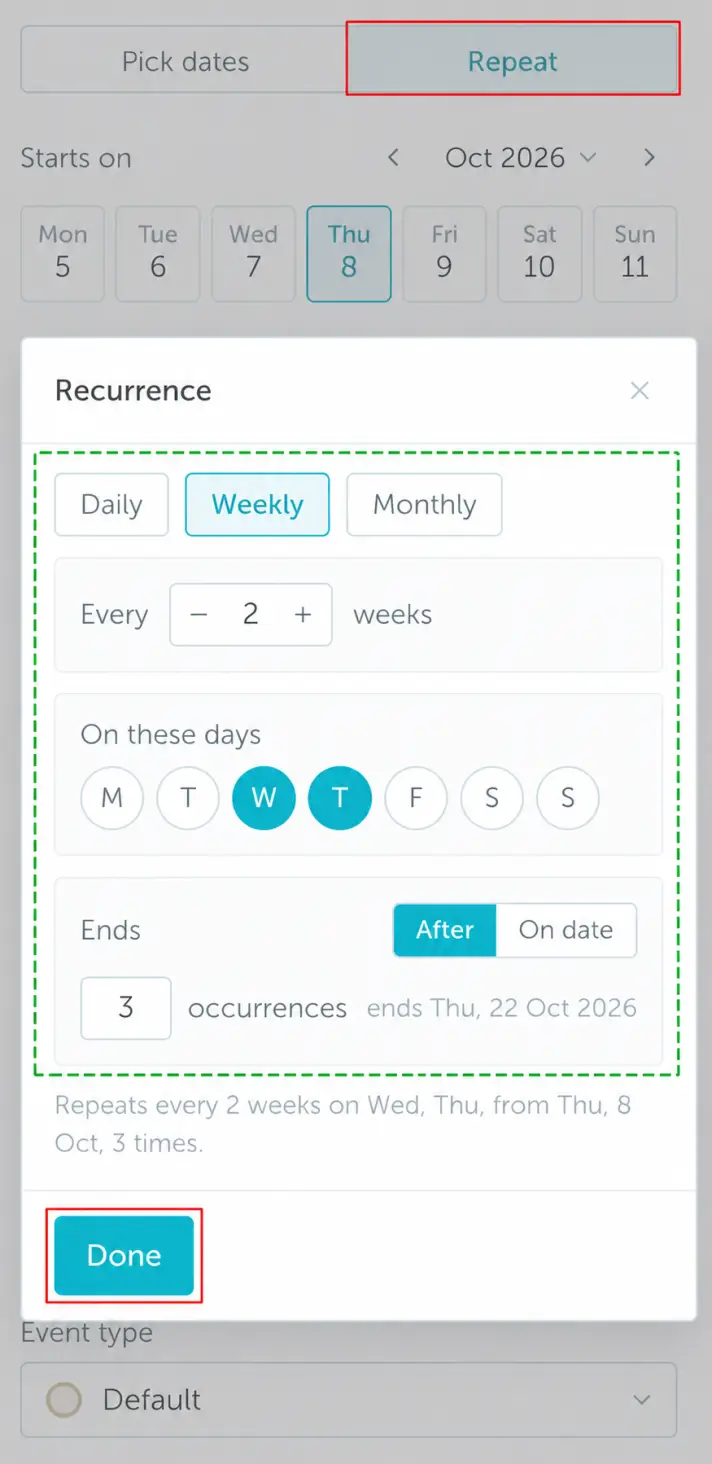
In the booking panel, select Repeat beside Pick dates, then choose the starting date under Starts on.
Configure the Recurrence settings:
- Choose Daily, Weekly, or Monthly.
- Set how often the booking repeats. For a weekly booking, use Every to set the number of weeks and select the weekdays under On these days.
- Under Ends, choose After and enter the number of occurrences, or choose On date and set an end date.
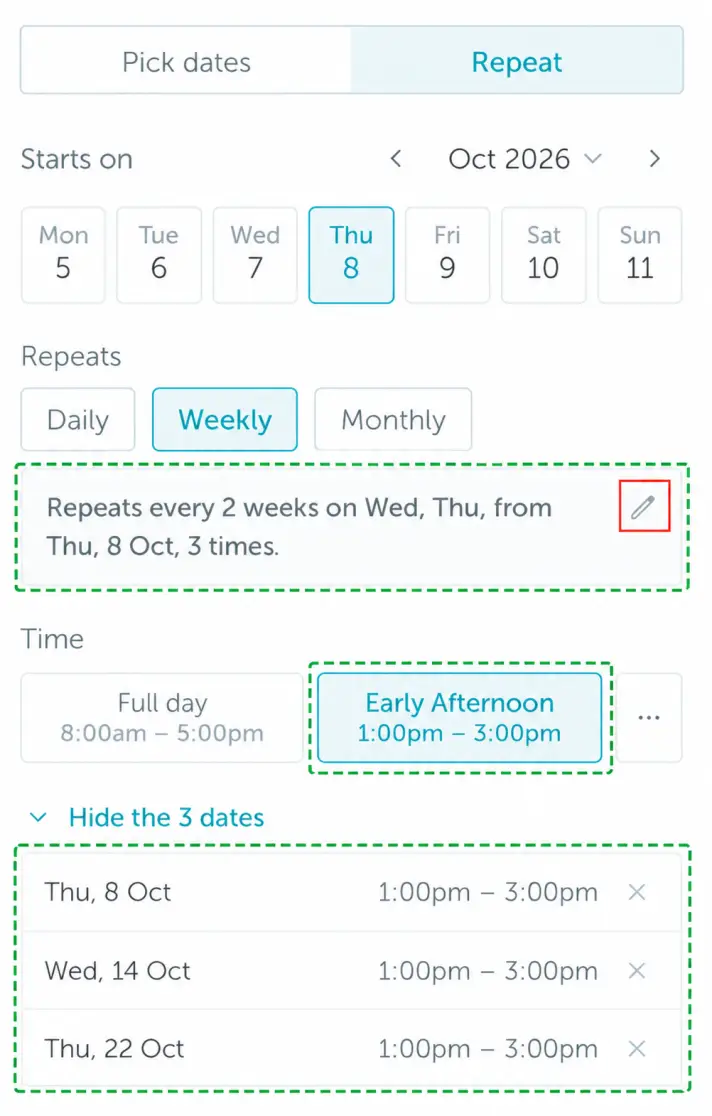
Review the summary, then click Done to apply the recurrence settings. The example below uses Weekly, Every 2 weeks, Wednesday and Thursday, and ends After 3 occurrences.
The booking panel shows a recurrence summary. Use the pencil icon to edit it. Choose a time interval under Time, then expand the dates list to review the individual occurrences. Use × beside a date to remove that occurrence.
In the example below, Early Afternoon, 1:00pm to 3:00pm, is selected for all three listed dates. Review the dates and times, complete any other booking details, then click Book to create the reservations.
7. Private bookings
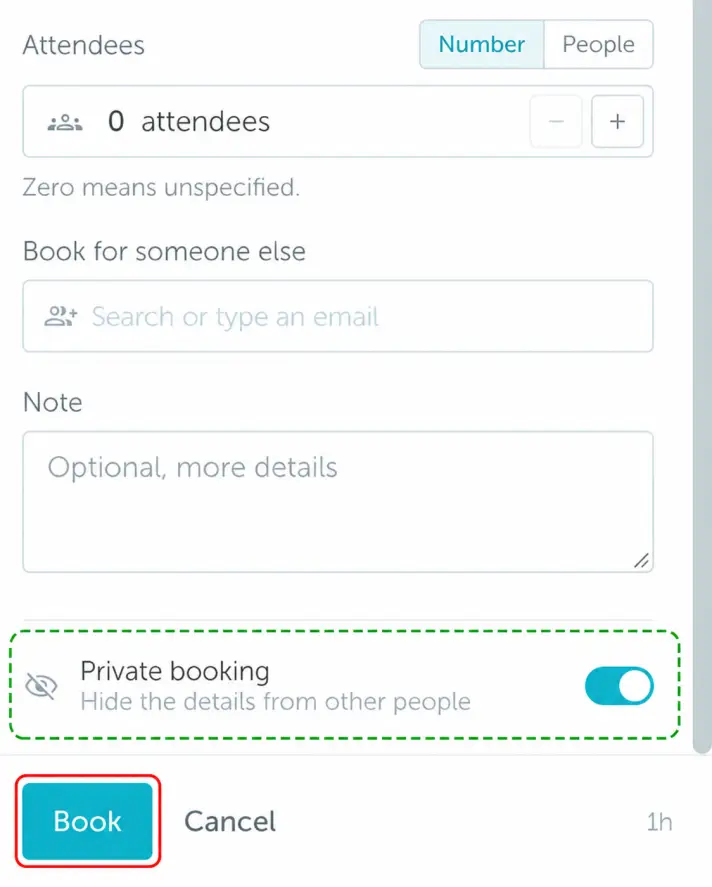
Enable Private booking near the bottom of the booking panel to hide booking details from other people. The example below shows the switch enabled. Click Book to create the reservation with privacy enabled.
Private bookings hide details such as the booker’s name, profile image, and meeting title from other users. Administrators, Supervisors, and Managers can still view these details.